






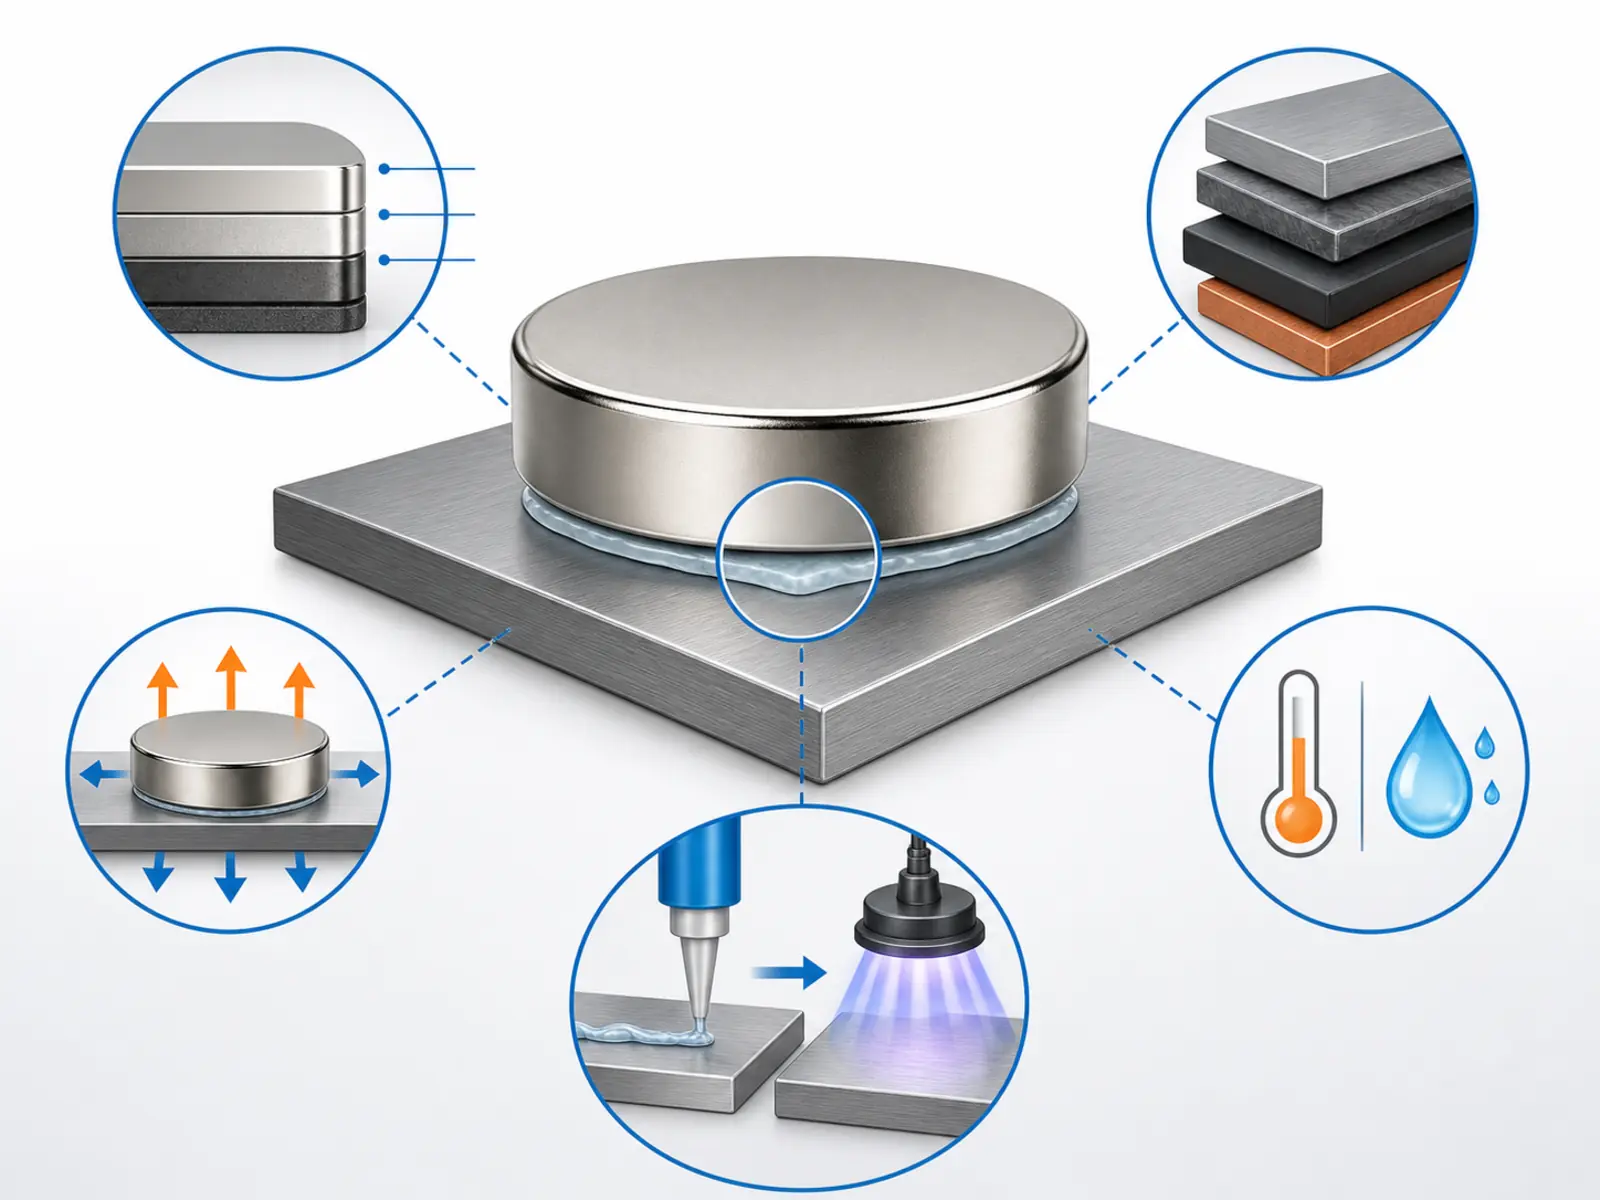
Wybór najlepszego kleju do magnesów zależy od powłoki magnesu, materiału łączonego elementu, kierunku obciążenia, warunków środowiskowych, grubości spoiny i procesu produkcyjnego. Nie ma jednego kleju, który byłby najlepszy do każdego zespołu z magnesami neodymowymi.
W przypadku trwałych zespołów przemysłowych inżynierowie często w pierwszej kolejności oceniają dwuskładnikowe kleje epoksydowe lub konstrukcyjne kleje akrylowe. Kleje cyjanoakrylowe mogą być odpowiednie do małych, dobrze dopasowanych części, natomiast kleje elastyczne lub taśmy klejące aktywowane dociskiem wymagają weryfikacji pod kątem konkretnego zastosowania. Oficjalne wytyczne Permabond dotyczące klejenia magnesów potwierdzają, że w zależności od wymagań produkcyjnych i aplikacyjnych można rozważyć kilka grup klejów. Wytyczne Permabond dotyczące klejenia magnesów
W tym poradniku omówiono nakładane zewnętrznie kleje ciekłe, konstrukcyjne i elastyczne oraz taśmy klejące. Magnesy z wcześniej naniesioną warstwą klejącą stanowią odrębną metodę mocowania.
Przed uruchomieniem produkcji:
- Określ rodzaj powłoki magnesu i rzeczywistą powierzchnię łączonego elementu.
- Określ sposób obciążenia połączenia.
- Sprawdź temperaturę, wilgoć, substancje chemiczne, drgania i uderzenia.
- Zapoznaj się z aktualnymi kartami TDS i SDS wybranego kleju.
- Przetestuj reprezentatywne zespoły w rzeczywistych warunkach eksploatacji.
Jaki rodzaj kleju warto rozważyć?
Poniższa tabela służy do wstępnej selekcji, a nie do zatwierdzania produktów.
| Rodzaj kleju | Dlaczego warto go ocenić | Kwestie wymagające potwierdzenia przed wyborem |
|---|---|---|
| Dwuskładnikowy klej epoksydowy | Trwałe, sztywne zespoły i połączenia, które mogą wymagać wypełnienia pewnej szczeliny | Czy dany produkt zapewnia przyczepność do obu łączonych powierzchni? Jaką szczelinę, proporcję mieszania, czas unieruchomienia, czas pełnego utwardzenia i warunki środowiskowe dopuszcza jego TDS? |
| Klej akrylowy konstrukcyjny | Zespoły metalowe i procesy produkcyjne, w których może być konieczne szybkie uzyskanie wytrzymałości manipulacyjnej | Czy wymaga aktywatora lub podkładu? Czy jest kompatybilny z powłoką magnesu, podłożem, szczeliną i procesem produkcyjnym? |
| Klej cyjanoakrylowy | Małe, ściśle dopasowane części wymagające szybkiego unieruchomienia | Czy wytrzyma rzeczywistą szerokość szczeliny, obciążenia oddzierające i udarowe oraz warunki wilgotnościowe i temperaturowe przez cały wymagany okres eksploatacji? |
| Klej elastyczny lub poliuretanowy | Zespoły, w których istotne mogą być przemieszczenia lub różnice rozszerzalności cieplnej | Czy zapewnia wystarczającą sztywność i odporność na warunki środowiskowe przy wymaganym obciążeniu? |
| Taśma klejąca aktywowana dociskiem | Płaskie powierzchnie i procesy mocowania wymagające kontrolowanej grubości | Czy w rzeczywistym położeniu montażowym jest odporny na długotrwałe obciążenie, oddziaływanie czynników na krawędzie, temperaturę, wilgoć i pełzanie? |
Kleje o różnym składzie chemicznym różnią się wymaganiami dotyczącymi przygotowania powierzchni, czasem otwartym, tempem narastania wytrzymałości, elastycznością i odpornością na uderzenia. Dlatego wyboru należy dokonywać na poziomie konkretnego produktu, a nie wyłącznie na podstawie nazwy grupy klejów. Materiały 3M dotyczące klejów konstrukcyjnych
Czy klej epoksydowy jest zawsze najlepszym klejem do magnesów?
Nie. Kleje epoksydowe są jedną z możliwych grup klejów, jednak poszczególne produkty różnią się sztywnością, zdolnością wypełniania szczelin, procesem utwardzania, odpornością temperaturową i kompatybilnością z podłożem.
Produkt odpowiedni do sztywnego zespołu stalowego może nie nadawać się do obudowy z tworzywa sztucznego, warunków powtarzających się uderzeń, krótkiego cyklu produkcyjnego ani łączenia materiałów o dużej różnicy rozszerzalności cieplnej.
Kiedy należy rozważyć zastosowanie strukturalnego kleju akrylowego?
Strukturalne kleje akrylowe są często brane pod uwagę w zespołach łączących magnes z metalem oraz w procesach produkcyjnych wymagających stosunkowo szybkiego ustalenia elementów.
Niektóre produkty wymagają aktywatora, podkładu lub określonego sposobu mieszania. Wymóg ten należy uwzględnić w planowaniu produkcji, a nie dopiero po wykonaniu próbek.
Czy klej cyjanoakrylowy może utrzymać magnes neodymowy?
Klej cyjanoakrylowy, potocznie nazywany klejem błyskawicznym, może sprawdzić się w przypadku małych części o czystych i ściśle przylegających powierzchniach.
Nie należy zakładać, że szybkie ustalenie elementów oznacza odporność połączenia na dużą szczelinę, powtarzające się oddzieranie, uderzenia, wilgoć lub długotrwałe oddziaływanie temperatury. Należy sprawdzić dokumentację konkretnego produktu i przetestować rzeczywisty zespół.
Co należy sprawdzić przed wyborem kleju do magnesów?
1. Jaka powłoka znajduje się na magnesie?
Połączenie klejowe magnesu neodymowego jest zwykle wykonywane na jego zewnętrznej powłoce. Opcje powłok Osenc mogą obejmować NiCuNi, cynk, powłokę epoksydową, złoto, PTFE, Parylene oraz inne systemy dostosowane do konkretnego projektu.
Klej musi zatem łączyć się z powłoką, a nie po prostu z “neodymem”.”
Materiał NdFeB jest podatny na korozję i zwykle zabezpiecza się go powłoką. Uszkodzenie tej warstwy ochronnej podczas przygotowania powierzchni może stwarzać ryzyko korozji. Wytyczne Arnold Magnetic Technologies dotyczące produkcji magnesów
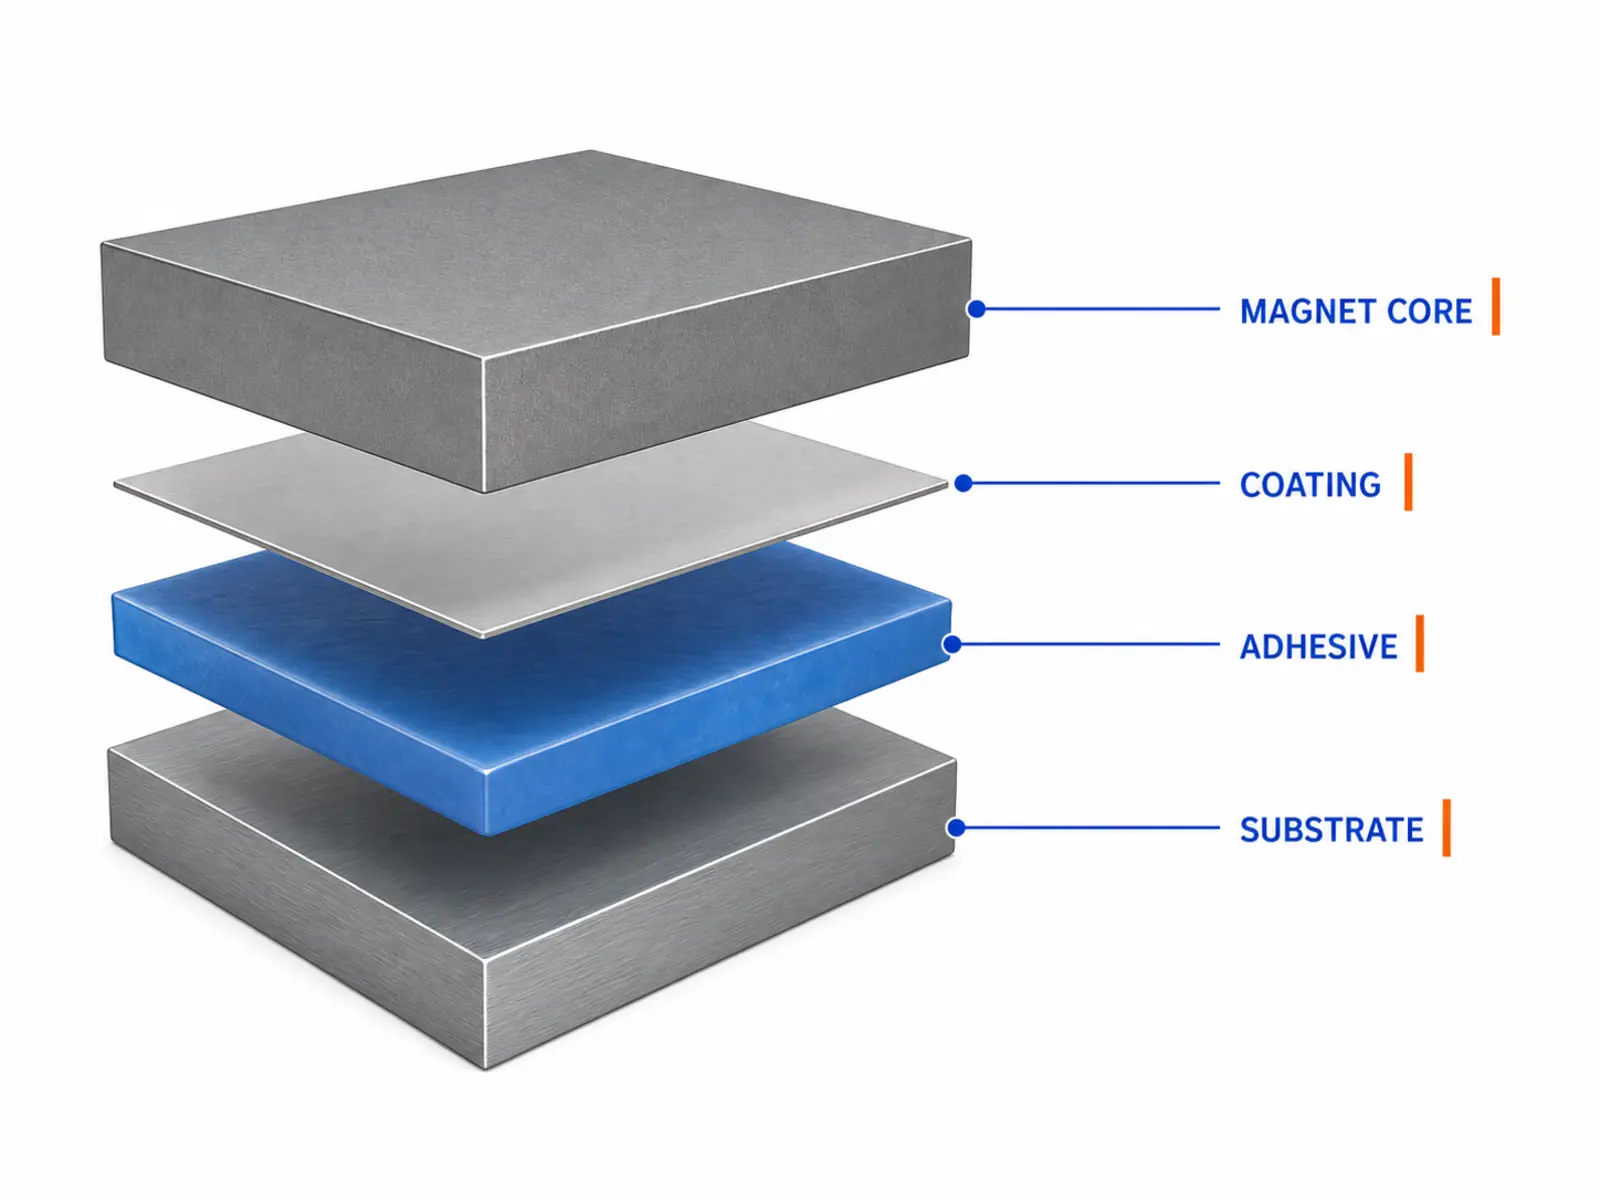
Możliwe miejsca uszkodzenia obejmują:
- Between the adhesive and magnet coating.
- Inside the adhesive.
- Inside the coating system.
- Between the coating and magnet.
- Between the adhesive and mating component.
- Between paint or powder coating and its base metal.
Confirm the exact coating before defining the bonding process. See Osenc’s overview of neodymium magnet coatings when preparing the magnet specification.
2. What is the actual mating surface?
Steel, stainless steel, bare aluminum, anodized aluminum, plastic, paint, and powder coating are different bonding surfaces.
The adhesive contacts the surface finish—not the base material written on the drawing. Oil, dust, oxide, release agents, corrosion inhibitors, paint, and plastic additives may affect the joint.
3M’s structural adhesive guidance states that cleaning and surface preparation depend on the substrate and required bond performance. 3M surface preparation technical bulletin
Do not select a cleaning solvent by habit. Confirm it against the adhesive instructions, substrate compatibility information, and solvent SDS.
3. How will the joint be loaded?
Adhesive joints can experience tension, compression, shear, peel, and cleavage.
Peel and cleavage concentrate load near an edge. Shear, tension, and compression can distribute load across more of the bond area when the joint is designed correctly. 3M common stress types in adhesive joints
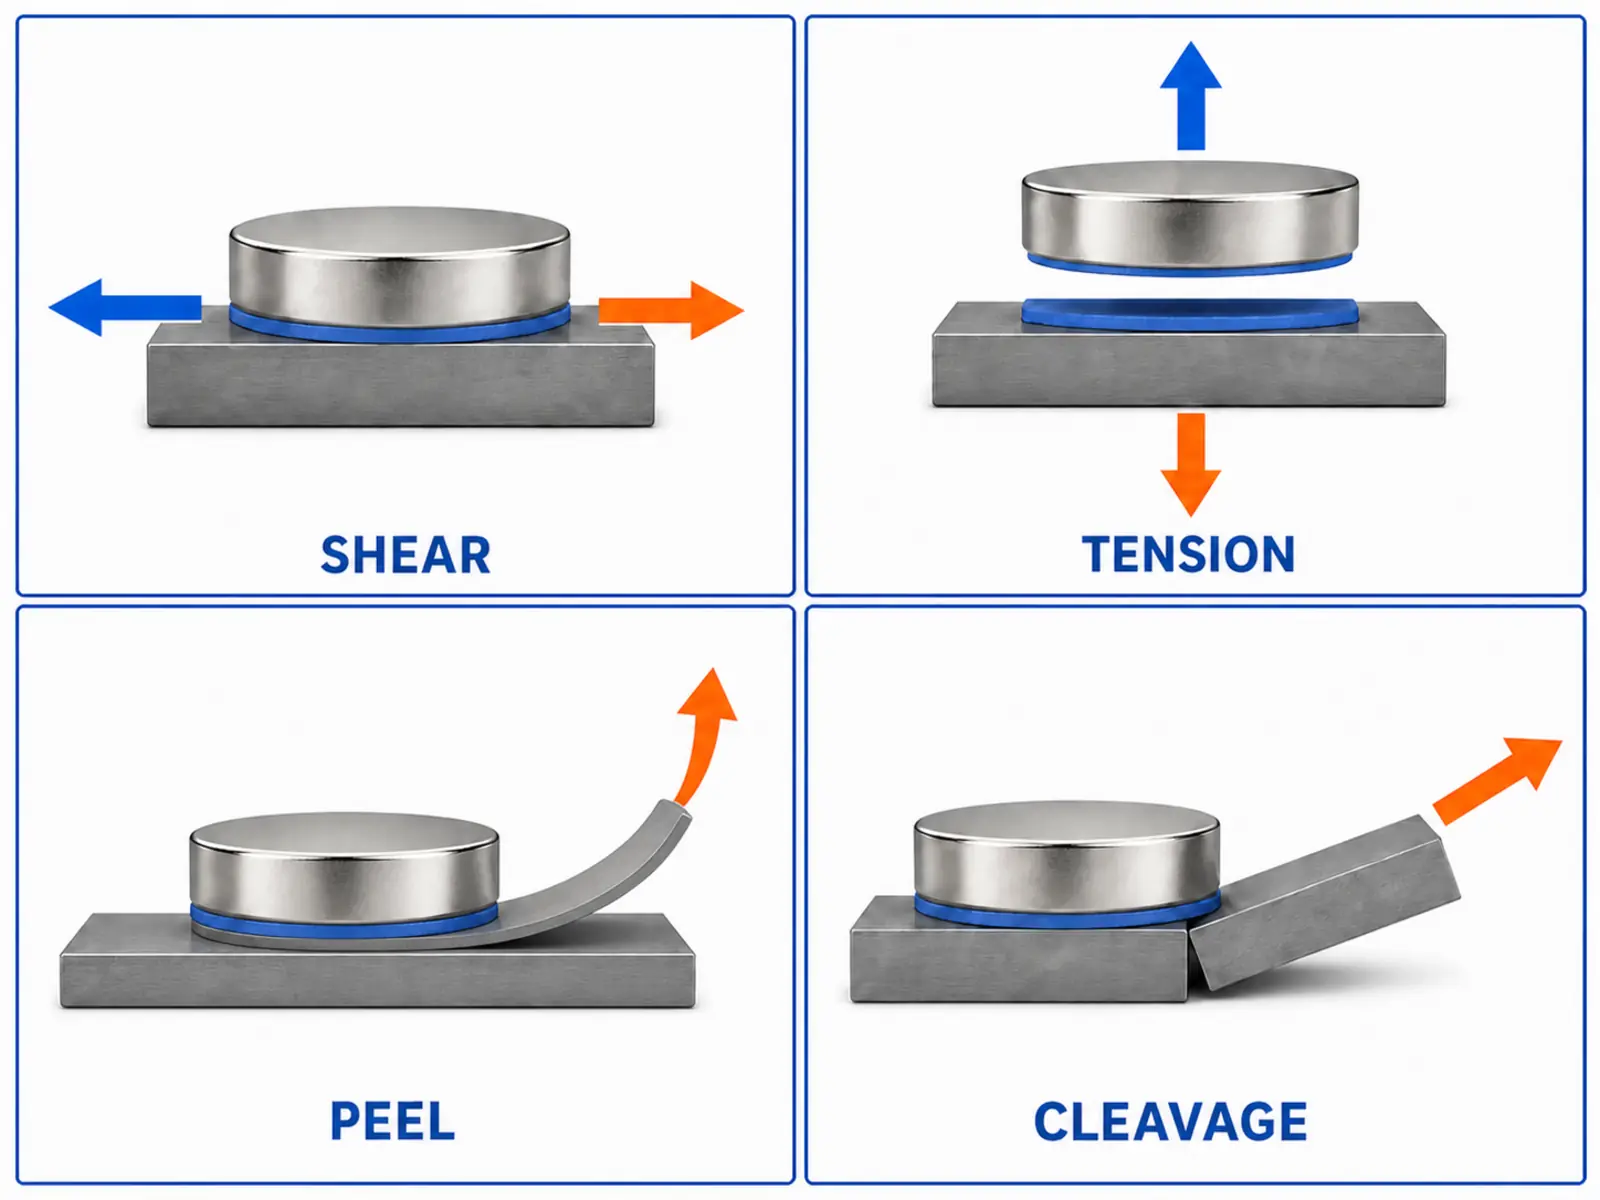
A magnet’s stated pull force is not automatically the design load for its adhesive joint. The magnet may be tested in a straight pull, while the installed adhesive experiences shear, peel, torque, impact, or a combination of loads.
Document both:
- The magnetic function required from the magnet.
- The mechanical load that the adhesive joint must resist.
4. What environment will the assembly face?
Confirm:
- Minimum and maximum service temperature.
- Assembly and curing temperature.
- Temperature cycling.
- Humidity or water exposure.
- Oils, cleaners, fuels, or other chemicals.
- Indoor or outdoor use.
- Vibration and impact.
- Required service life.
- Consequences if the joint fails.
Do not confuse adhesive application temperature, curing temperature, short-term exposure, and continuous service temperature.
The magnet grade, coating, adhesive, substrate, and nearby components must all tolerate the relevant conditions. There is no grade-independent temperature limit that can be applied to every neodymium magnet.
5. What gap and production process are available?
Confirm:
- Designed adhesive gap.
- Dimensional variation between parts.
- Mix ratio, if applicable.
- Dispensing method.
- Working time.
- Fixture time.
- Full-cure conditions.
- Production quantity.
- Allowed squeeze-out.
- Inspection method.
Fixture time is not the same as full cure. Adhesive manufacturers report these as separate process conditions, and both can change with product and curing environment. 3M choosing and using a structural adhesive
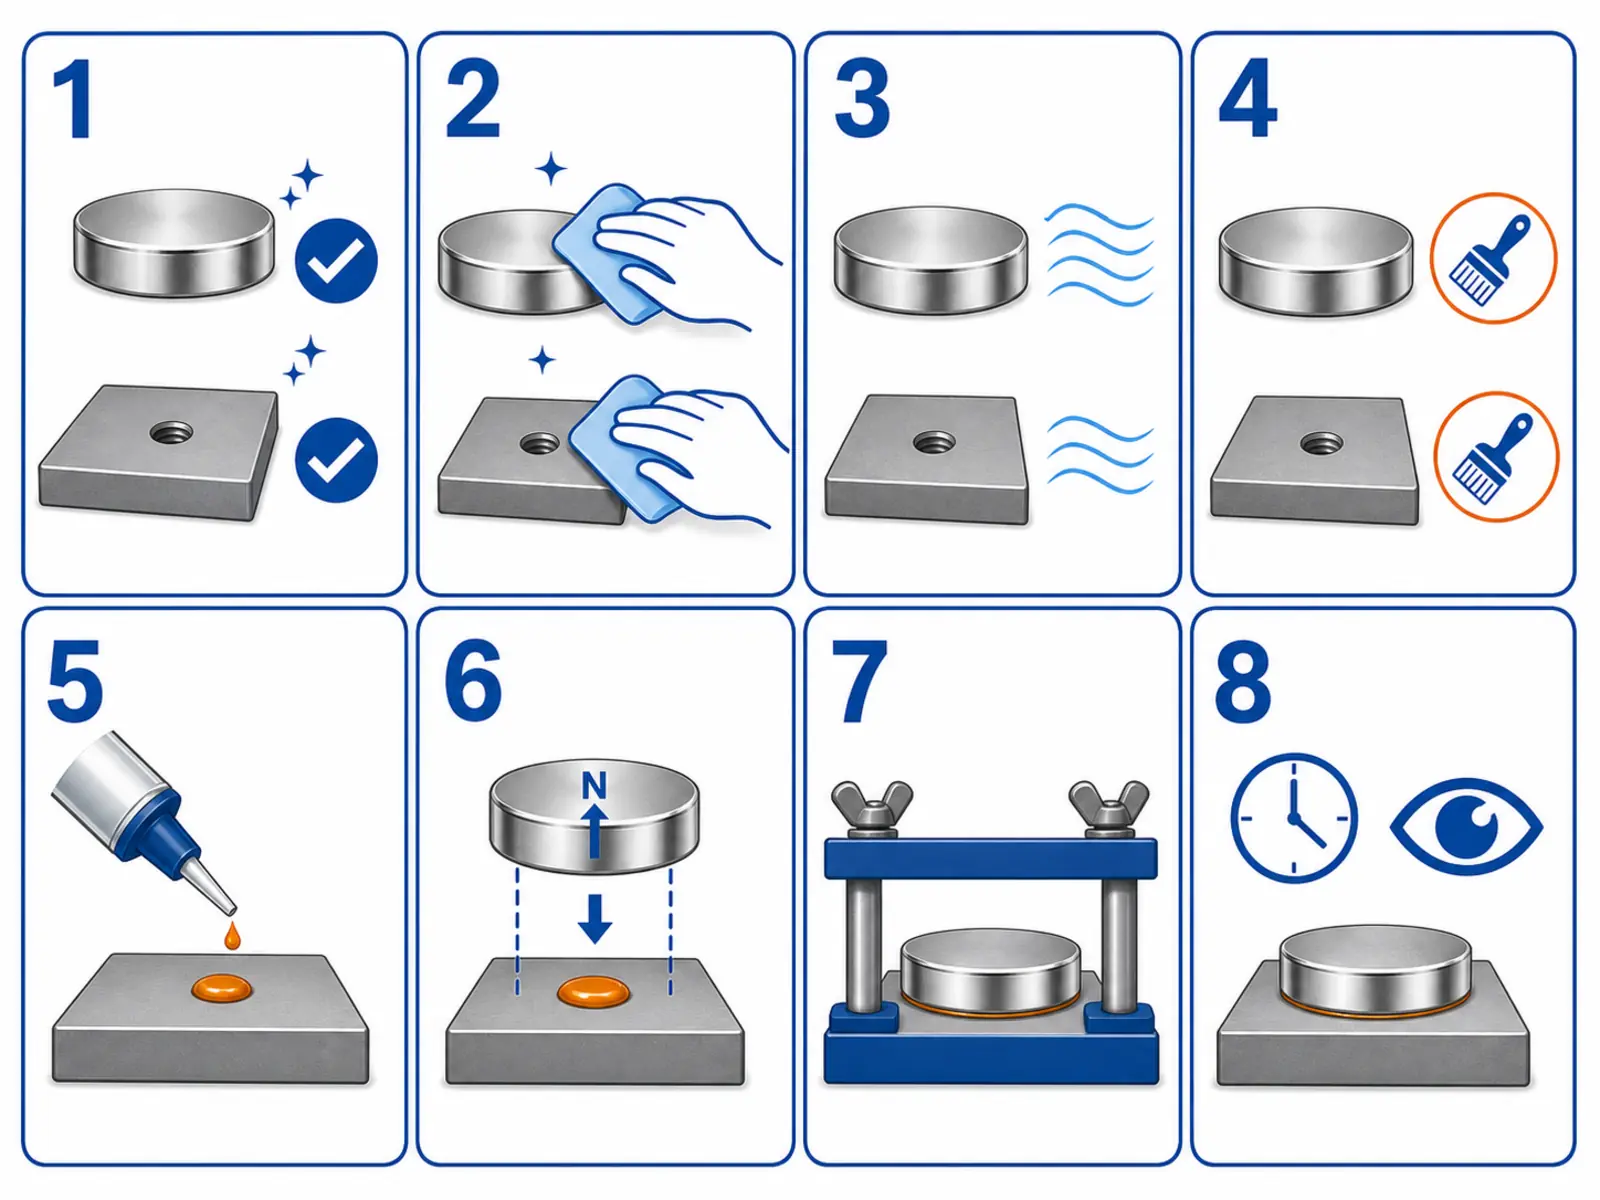
How Do You Glue Neodymium Magnets Step by Step?
Step 1: Confirm the coating and adhesive instructions
Identify the magnet coating, mating material, and surface finish.
Review the current TDS and SDS for the selected adhesive. Confirm surface preparation, gap, dispensing, mix ratio, fixture time, full cure, temperature, storage, and safety requirements.
Step 2: Dry-fit the assembly and check polarity
Check dimensions, clearance, adhesive space, magnetization direction, polarity, and fixture access before applying adhesive.
Strong magnets can attract steel tools, fixtures, and other magnets suddenly. Control the work area to reduce collision, chipping, pinching, and polarity errors.
Sintered rare-earth magnets are brittle and require careful handling. Arnold Magnetic Technologies magnet selection guidance
Also confirm whether bonding occurs before or after magnetization. There is no universal best sequence. The magnet and assembly supplier should review handling, polarity control, fixture design, surrounding components, and whether the completed assembly can be magnetized as intended.
Step 3: Clean the bonding surfaces
Remove contamination using a procedure that is compatible with:
- The magnet coating.
- The mating substrate.
- The selected adhesive.
- Workplace safety requirements.
Do not assume that one solvent works for every coating, plastic, paint, or adhesive. Allow the surfaces to reach the condition required by the adhesive instructions before bonding.
Step 4: Perform only the required surface treatment
Use abrasion, primer, plasma treatment, or another pretreatment only when required or permitted by the selected adhesive instructions and confirmed as compatible with the magnet coating.
Do not define a process that damages or removes the protective coating. If coating compatibility is unknown, pause and obtain confirmation from the magnet and adhesive suppliers.
Step 5: Apply a controlled amount of adhesive
Follow the required dispensing and mixing process.
Too little adhesive may leave incomplete coverage. Too much may create squeeze-out, contaminate nearby surfaces, interfere with final dimensions, or produce an uncontrolled gap.
Do not estimate a two-part mix ratio unless the product instructions explicitly permit that method.
Step 6: Position and fixture the magnet
Place the magnet in the correct orientation and hold it without sliding or rotating.
The fixture should maintain the required gap and alignment. It should not apply uncontrolled pressure that removes too much adhesive from the joint.
Step 7: Complete the specified cure
Maintain the time and temperature stated in the product TDS. Do not load or test the assembly merely because it has reached handling strength.
If heat is used, confirm that the complete cycle is compatible with the magnet grade, coating, substrate, fixture, adhesive, and surrounding components.
Step 8: Inspect the joint
Check:
- Magnet alignment and polarity.
- Visible movement.
- Squeeze-out.
- Incomplete coverage or visible voids.
- Coating damage.
- Interference with nearby parts.
- Compliance with the required cure record.
A visual inspection cannot prove long-term bond strength, but it can identify obvious process defects before validation testing.
How Do You Glue a Magnet to Metal?
Identify the actual metal surface before choosing the preparation process.
| Metal surface | What must be confirmed |
|---|---|
| Bare steel | Oil, oxide, corrosion inhibitor, roughness, and required preparation |
| Stal nierdzewna | Grade, surface finish, contamination, and adhesive compatibility |
| Bare aluminum | Oxide condition and required pretreatment |
| Anodized aluminum | Condition and sealing of the anodized layer |
| Painted or powder-coated metal | Adhesion and durability of the coating itself |
| Plated metal | Plating type, condition, cleanliness, and adhesion to the base material |
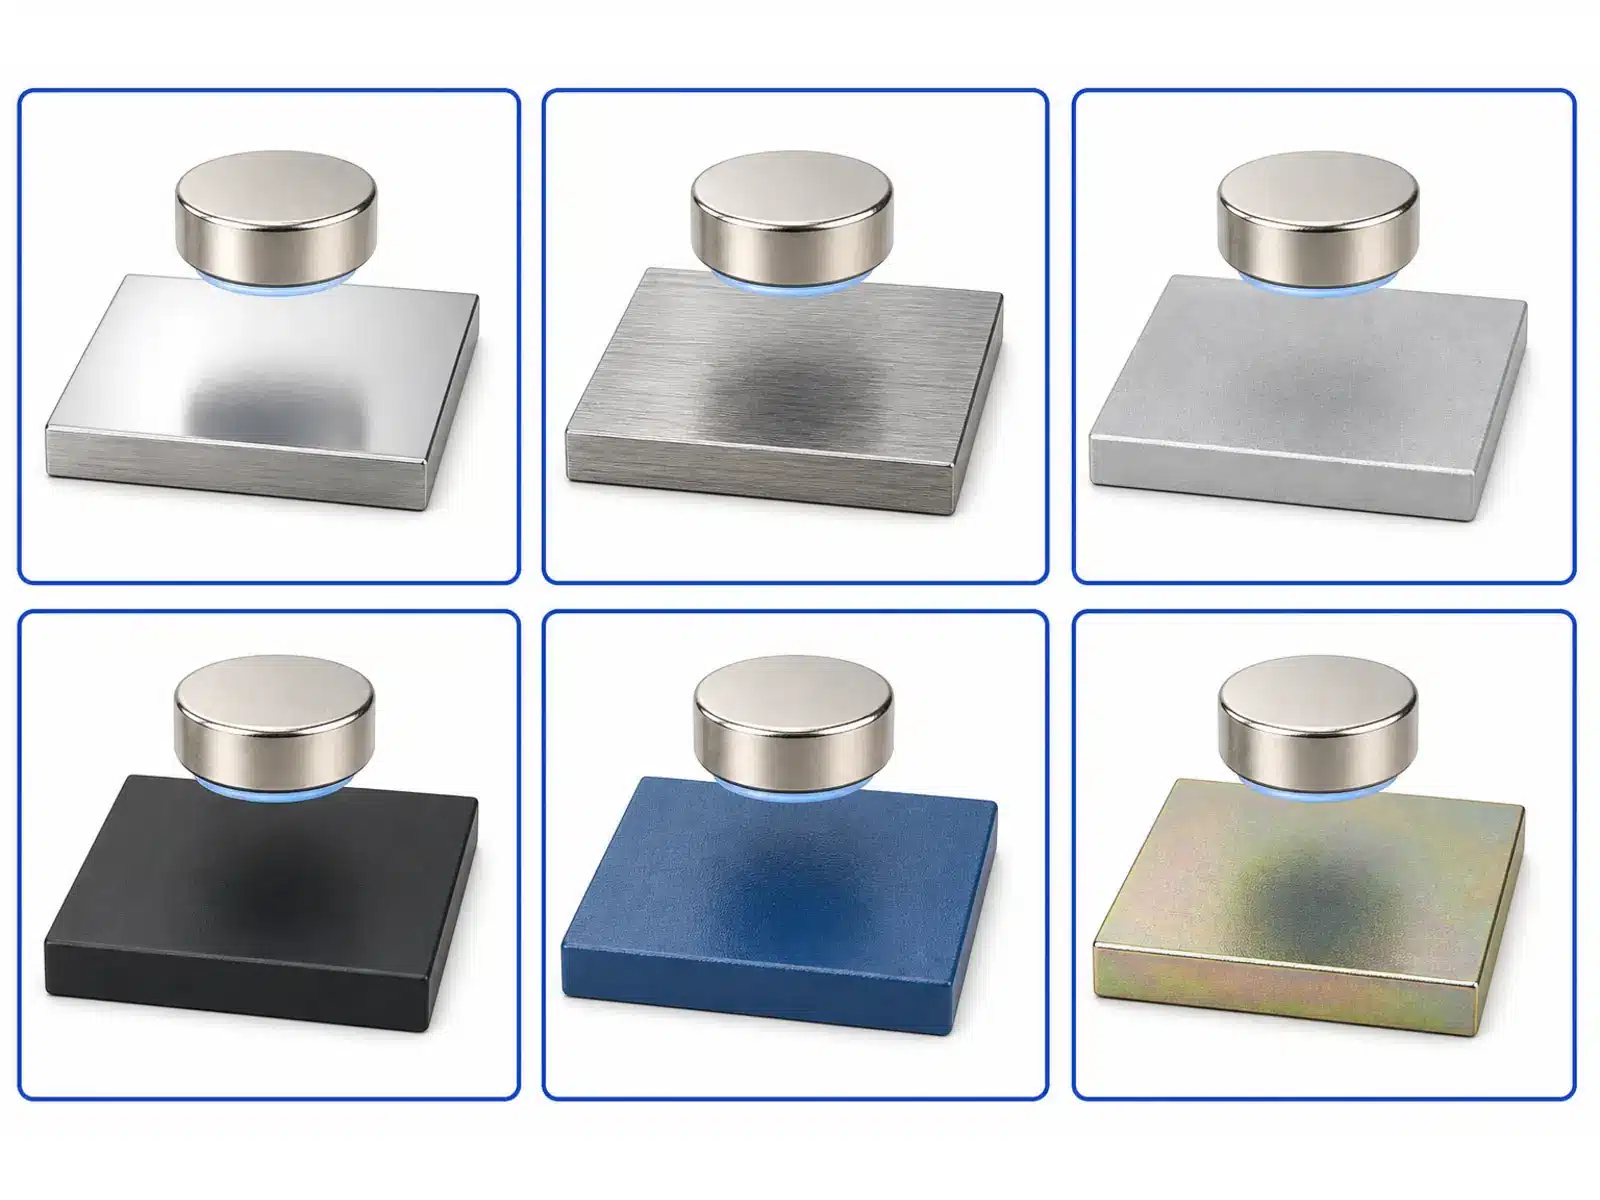
For painted, powder-coated, plated, or anodized parts, the adhesive is bonded to the surface layer. A strong adhesive cannot compensate for a surface layer that separates from its base material.
If the bonded metal also forms part of the magnetic circuit, include the adhesive location and intended bond gap in the drawing. Osenc can evaluate the magnetic layout when the complete geometry, magnetization direction, steel component, and working requirement are supplied.
Should You Sand a Neodymium Magnet Before Gluing It?
Not automatically.
Abrasion should be used only when the selected adhesive instructions require or permit it and the process is compatible with the magnet coating. Aggressive sanding can damage the protective surface.
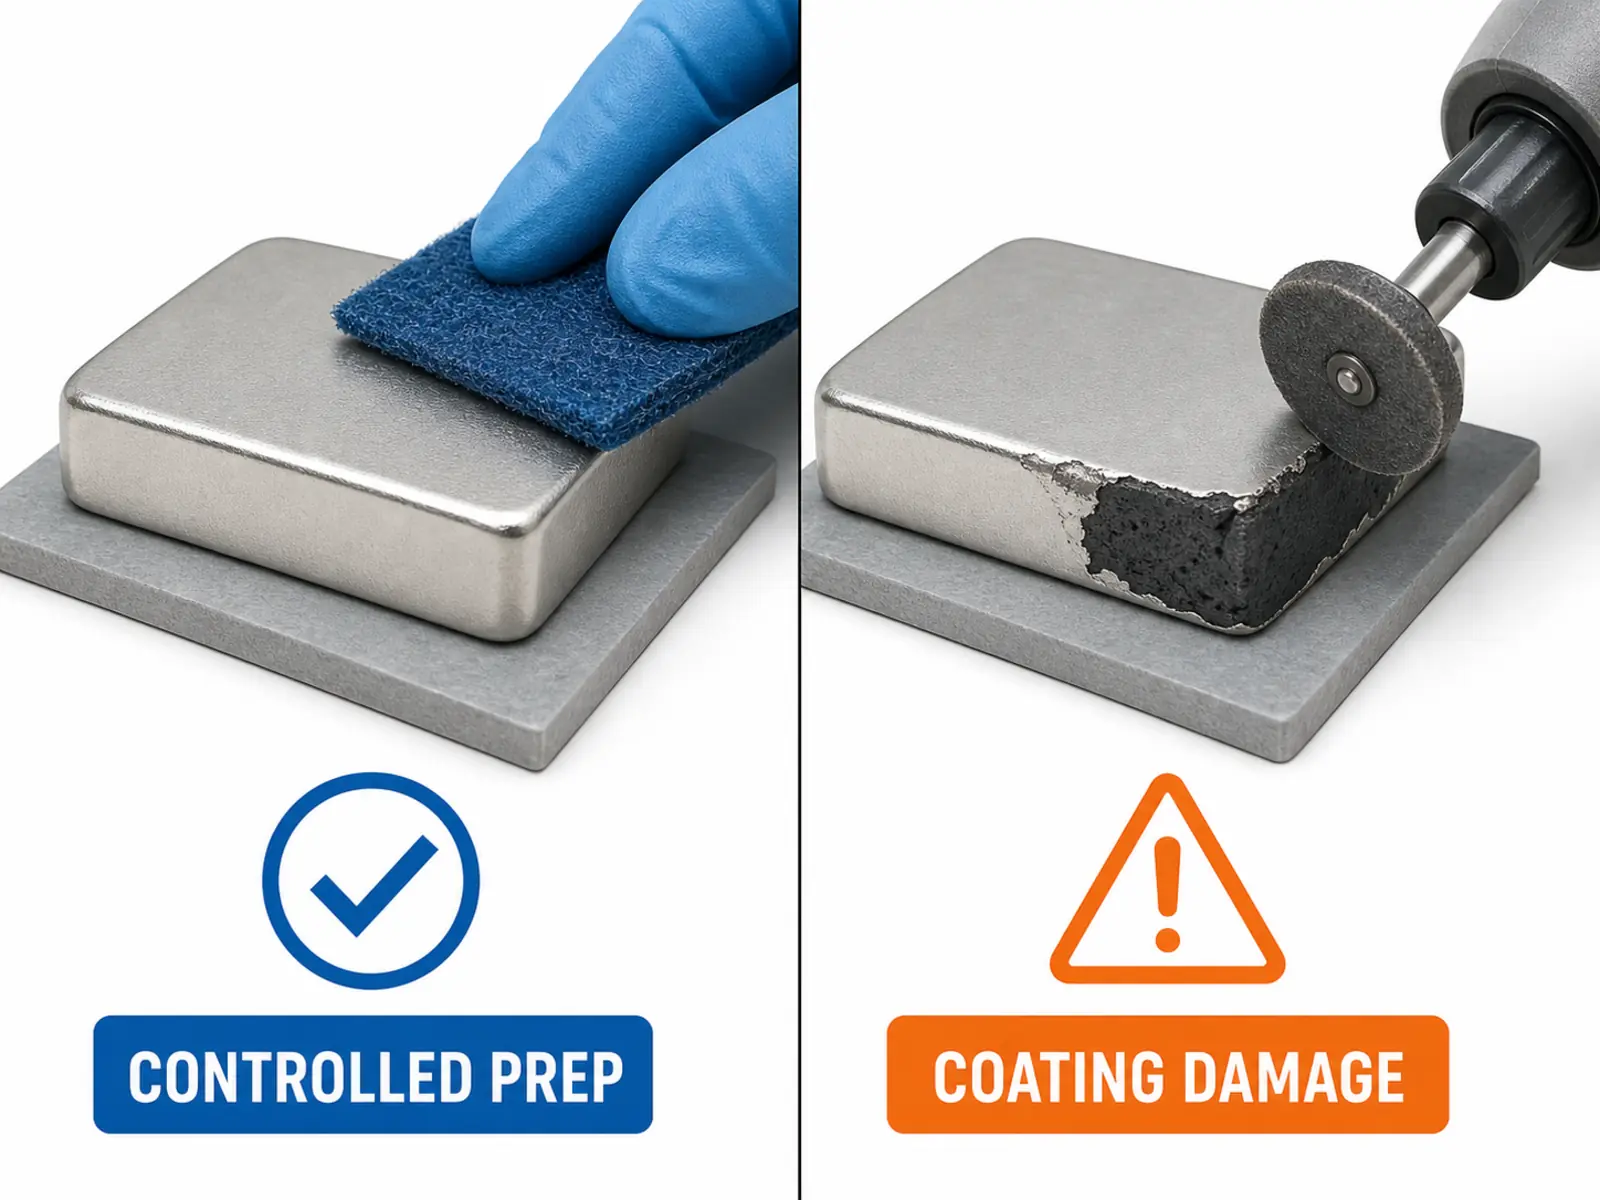
Do not use a universal abrasive grade, sanding time, pressure, or percentage of surface area. Do not deliberately sand through the coating to expose another layer unless a qualified process has been reviewed and approved for that exact magnet and adhesive system.
If abrasion is approved, production instructions should define:
- Abrasive material.
- Process direction.
- Applied pressure or equipment settings.
- Cleaning after abrasion.
- Coating inspection.
- Acceptance criteria.
Without these controls, manual sanding may create inconsistent production results.
Why Do Glued Magnets Fail?
Inspect the failure surface before changing the adhesive.
| Failure observation | Possible causes to investigate | What to check |
|---|---|---|
| Adhesive separates cleanly from the magnet | Contamination, incompatible coating, or incomplete surface preparation | Coating identity, cleaning record, primer, and adhesive compatibility |
| Adhesive separates from the mating component | Contamination or weak surface layer | Paint, oxide, plastic additives, oil, or release agent |
| Adhesive tears inside itself | Excessive load, unsuitable properties, or incomplete cure | Load direction, bond area, temperature, mix ratio, and cure record |
| Magnet coating lifts | Coating-interface failure or coating damage | Incoming coating condition, surface preparation, and environmental exposure |
| Joint opens from one edge | Peel or cleavage loading | Joint geometry, stiffness, impact, and mechanical retention |
| Adhesive remains soft | Incorrect mixing, cure conditions, or material storage | Mix ratio, batch, storage, temperature, and full-cure time |
| Failure appears after service exposure | Moisture, chemicals, cycling, corrosion, or creep | Environmental conditions and material compatibility |
| Magnet breaks while the bond remains | Impact, stress concentration, or unsupported brittle material | Housing geometry, assembly handling, and edge loading |
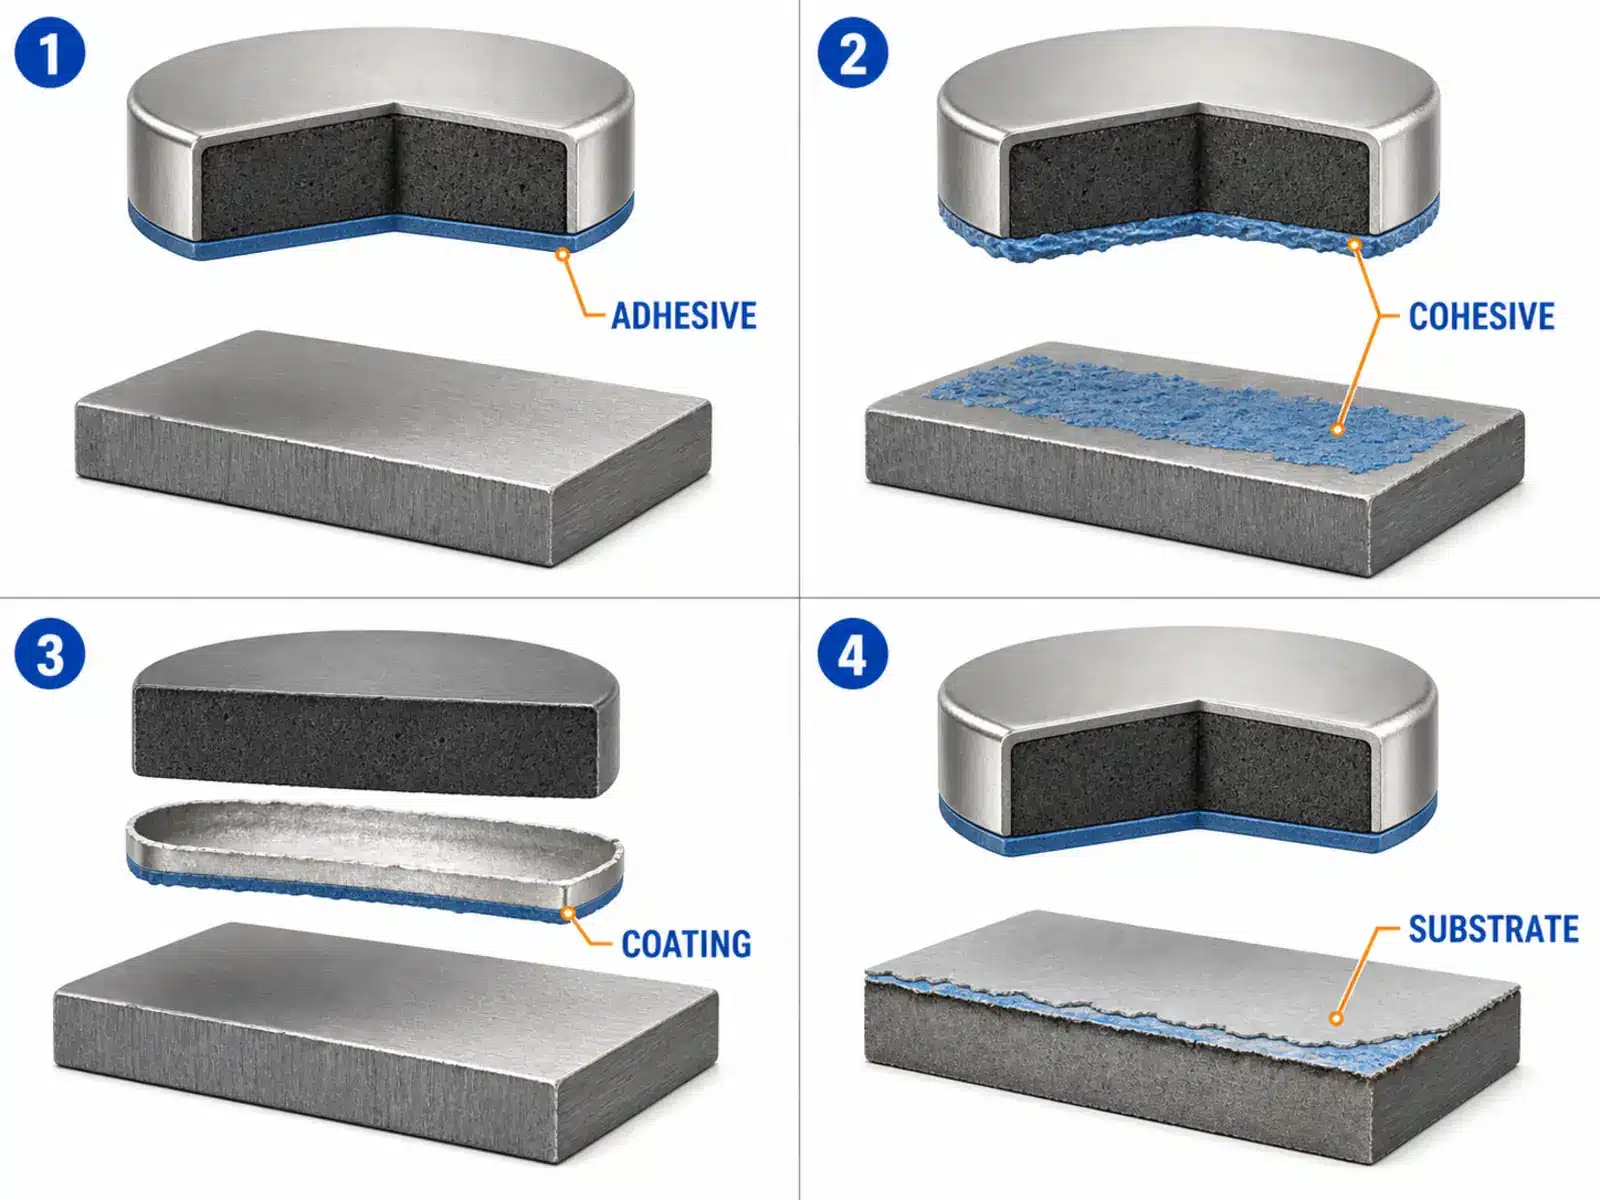
Record the number of failed samples, failure location, cure conditions, environmental exposure, and load direction. These details are more useful than simply reporting that “the glue failed.”
When Is Glue Alone Not Enough?
Consider mechanical retention when the assembly faces:
- Repeated peel or impact.
- High vibration.
- Rotation.
- Severe thermal or environmental cycling.
- Difficult-to-control surfaces.
- Safety-related consequences if the magnet separates.
Possible design options include a pocket, shoulder, cover, retaining cap, or housing that limits movement.
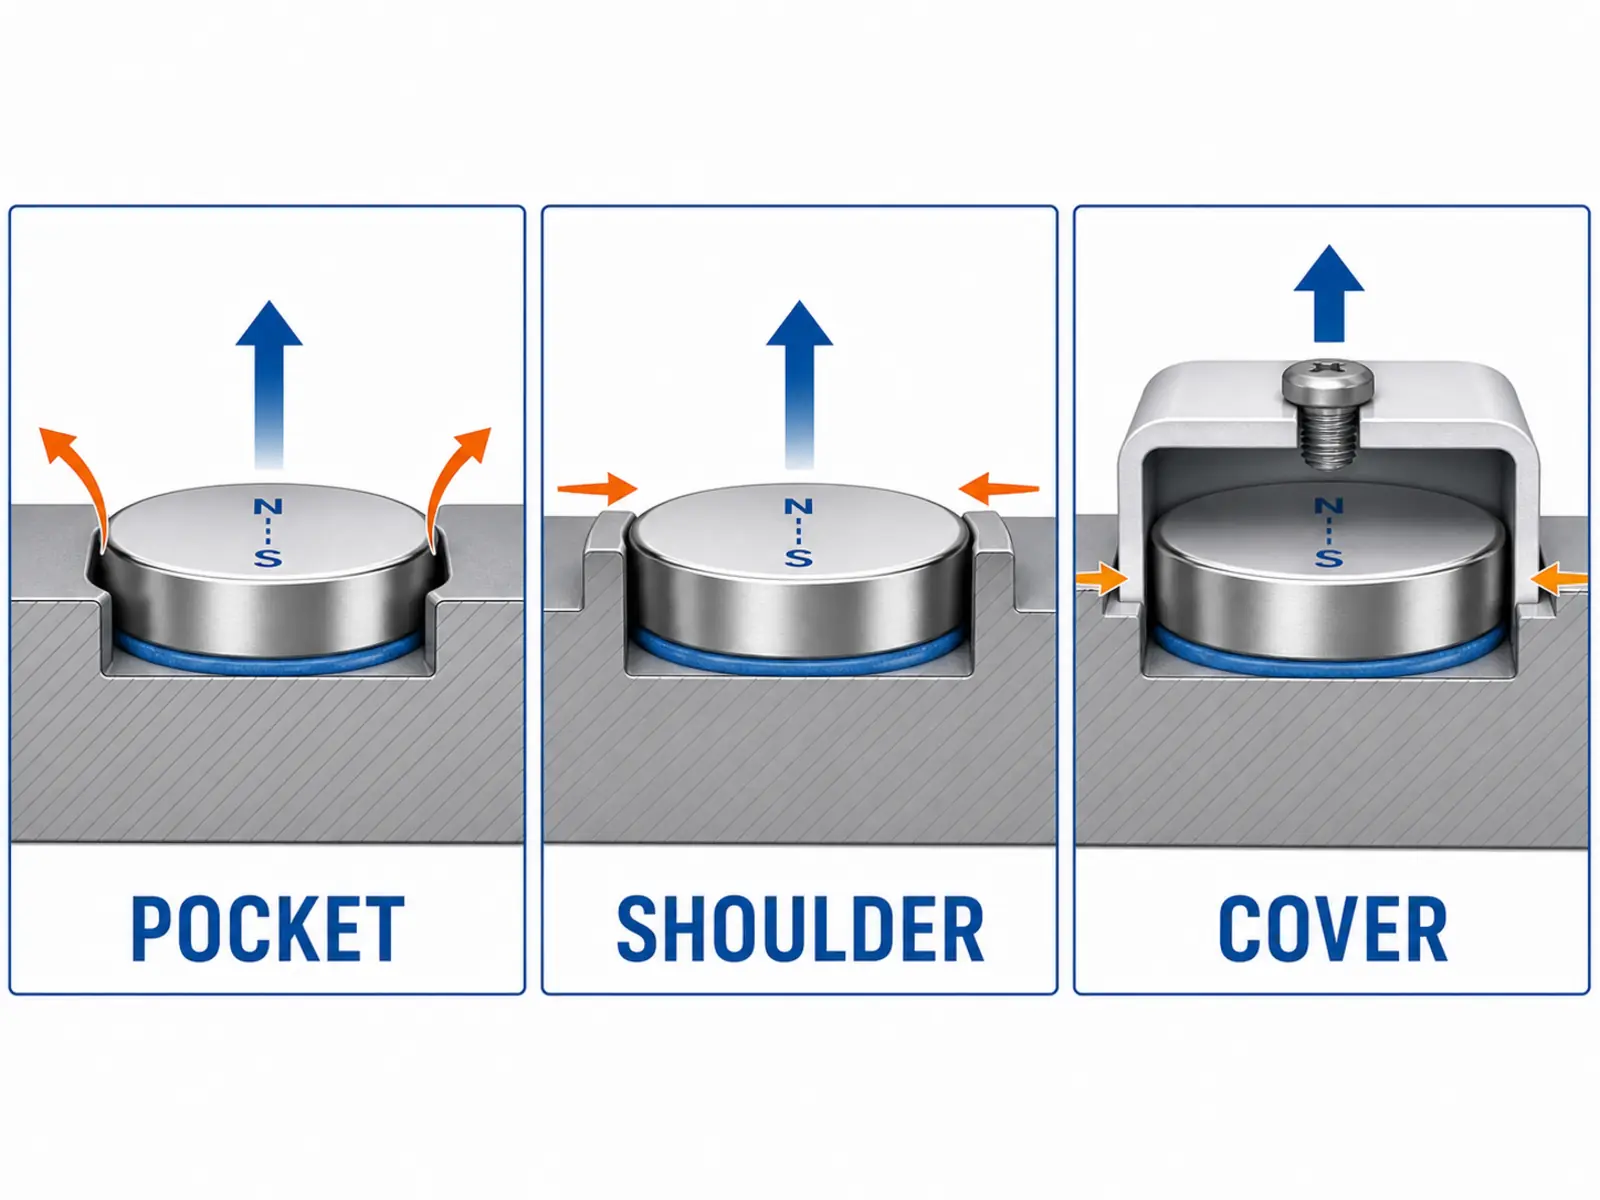
These are design options, not universal solutions. Geometry, material, clearance, magnetic function, assembly method, and stress on the brittle magnet require project-specific review.
3M’s joint-design guidance also shows that geometry can redistribute concentrated cleavage or peel loads and may add mechanical support. 3M adhesive joint design guidance
How Should You Validate the Bond Before Production?
Test representative production parts rather than relying only on a hand pull or a generic adhesive strength value.
| Validation input | What to record |
|---|---|
| Magnes | Grade, coating, dimensions, magnetization, and production condition |
| Mating component | Material, surface finish, cleanliness, and geometry |
| Klej | Exact product, batch, storage condition, and application method |
| Process | Surface preparation, amount, gap, fixture, cure time, and temperature |
| Samples | Sample quantity and production variation represented |
| Load | Direction, rate, magnitude, duration, impact, torque, or combined loading |
| Warunki środowiskowe | Temperature, cycling, humidity, water, and chemicals |
| Results | Measured value, movement, visible damage, and failure location |
| Acceptance | Project-defined pass/fail requirement and consequence of failure |
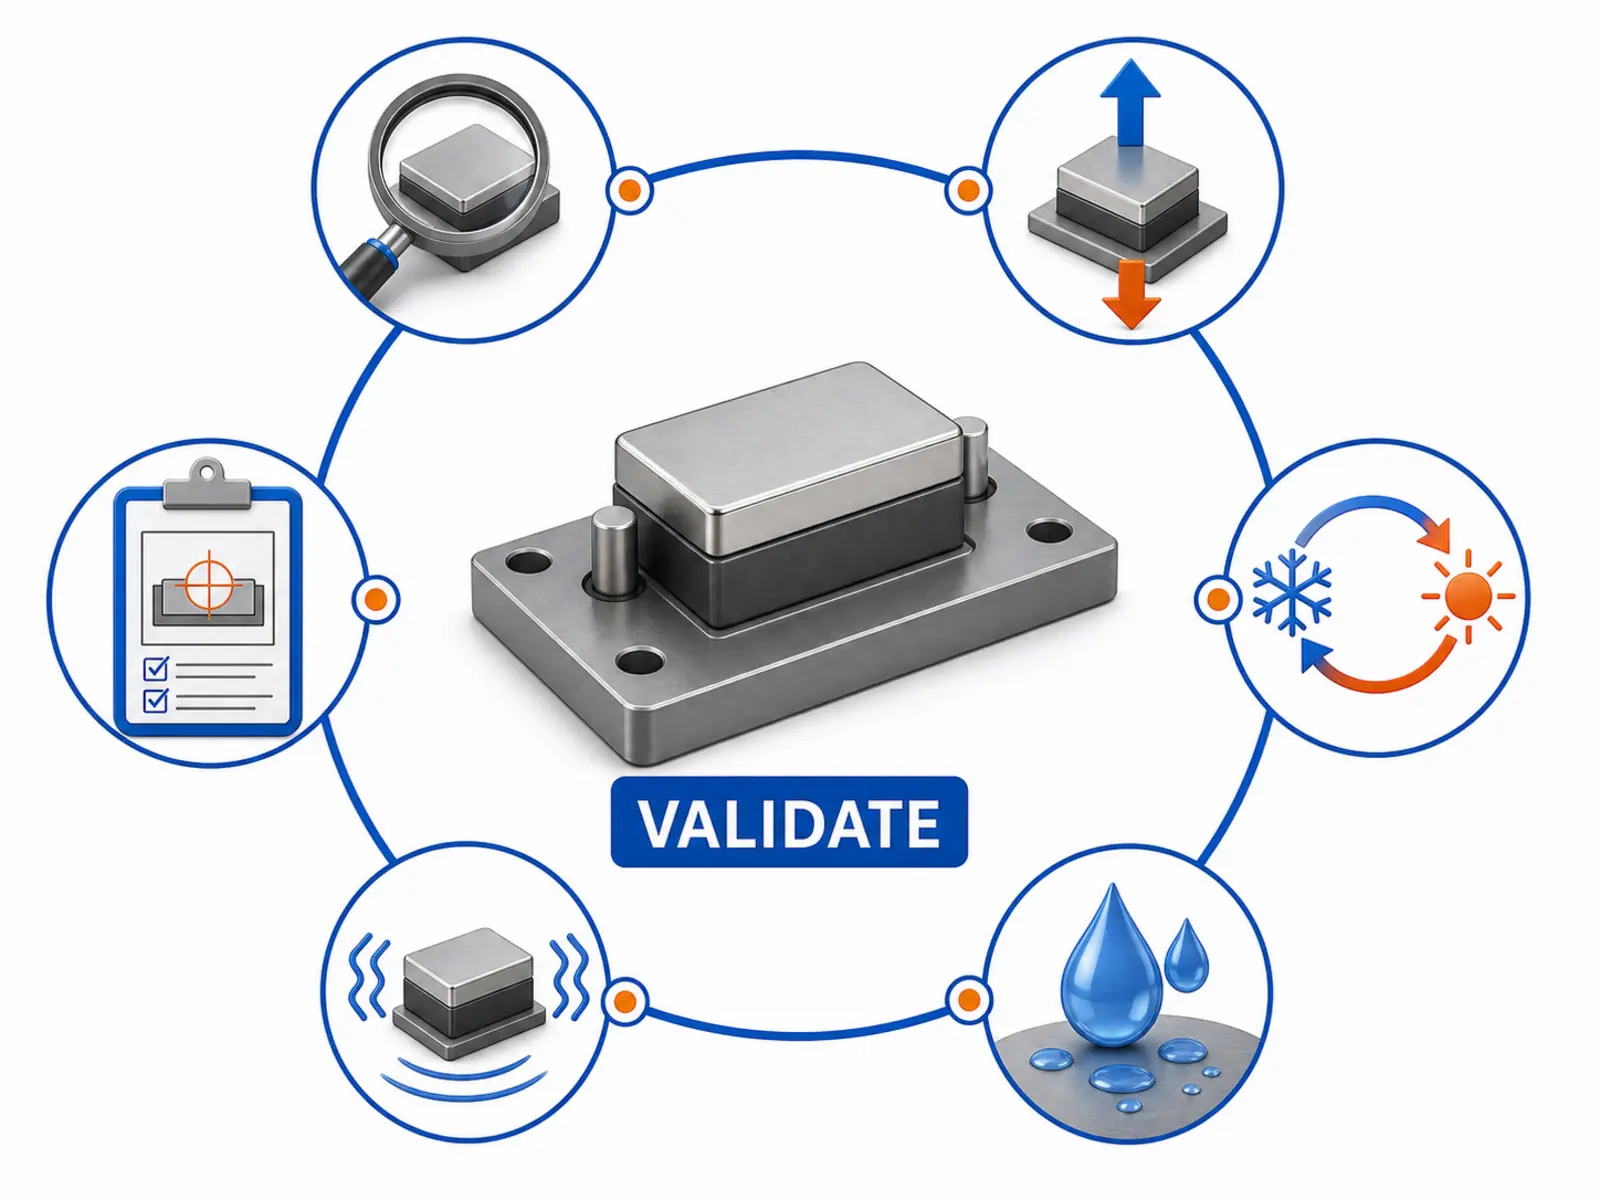
The project must define the sample quantity, conditioning, loading method, acceptance value, and safety factor. This article does not provide universal test values.
What Information Should You Include in a Magnet Bonding RFQ?
Send:
- Magnet drawing, dimensions, and shape.
- Required magnetic function.
- Magnet grade, if already selected.
- Magnetization direction and pole layout.
- Magnet coating.
- Mating-component material and surface finish.
- Available bond area.
- Designed adhesive gap and dimensional variation.
- Mechanical load direction.
- Required magnetic pull, field, torque, positioning, sensing, or coupling result.
- Assembly and operating temperatures.
- Humidity, water, chemical, vibration, and impact exposure.
- Expected service life.
- Consequences if the magnet separates.
- Whether bonding occurs before or after magnetization.
- Proposed adhesive, primer, or activator, if already selected.
- Production quantity and target process time.
- Required inspection and validation method.
- Need for mechanical retention.
- Prototype quantity.
Osenc can review drawings and application requirements for magnesy neodymowe wykonywane na zamówienie, including grade, coating, dimensions, tolerance, magnetization direction, and assembly structure.
This review can help identify fit, polarity, coating, and magnetic-layout risks before sampling. Adhesive selection, bonding-process capability, and joint validation must still be confirmed for each project.
Najczęściej zadawane pytania
Jaki klej jest najlepszy do magnesów neodymowych?
Kleje epoksydowe i strukturalne kleje akrylowe są często rozważane w pierwszej kolejności przy wykonywaniu połączeń trwałych, jednak optymalny wybór zależy od rodzaju powłoki, podłoża, wielkości szczeliny, obciążenia, warunków środowiskowych i procesu utwardzania.
Czy klej cyjanoakrylowy utrzyma magnesy neodymowe?
Może utrzymywać niewielkie, ściśle dopasowane części. Konkretny produkt należy zweryfikować pod kątem wymagań dotyczących szczeliny, obciążenia odrywającego, udarów, wilgoci, temperatury i okresu eksploatacji.
Czy do magnesów można używać kleju termotopliwego?
Nie należy zakładać, że klej termotopliwy będzie odpowiedni. Należy sprawdzić jego temperaturę aplikacji, zachowanie pod długotrwałym obciążeniem, odporność na warunki środowiskowe oraz zgodność z wybraną klasą magnesu i powłoką.
Czy przed klejeniem należy przeszlifować magnes neodymowy?
Tylko wtedy, gdy dopuszcza to instrukcja stosowania kleju, a zgodność procesu przygotowania z powłoką została potwierdzona. Nie szlifować do przebicia warstwy ochronnej.
Jak długo powinien utwardzać się klej do magnesów?
Należy przestrzegać wymagań dotyczących pełnego utwardzenia podanych w karcie TDS właściwej dla danego produktu. Czas ustalenia lub czas manipulacyjny nie oznacza, że połączenie osiągnęło pełne utwardzenie.
Dlaczego przyklejony magnes się odrywa?
Typowe kwestie wymagające sprawdzenia obejmują zanieczyszczenia, niekompatybilne powierzchnie, niepełne utwardzenie, uszkodzenie powłoki, nadmierną szczelinę oraz obciążenie oddzierające.
Czy grubość warstwy kleju zmniejsza siłę magnetyczną?
Może to mieć znaczenie, gdy warstwa kleju zmienia funkcjonalną szczelinę magnetyczną lub obwód magnetyczny. Wpływ zależy od geometrii całego zespołu i należy go ocenić dla konkretnej konstrukcji.
Czy użyć kleju w płynie, czy magnesu z warstwą samoprzylepną?
Magnesy z warstwą samoprzylepną mogą ułatwić mocowanie do odpowiednich płaskich powierzchni. Nakładane kleje konstrukcyjne zapewniają różne możliwości wykonania projektowanych połączeń z uwzględnieniem materiałów, szczelin i warunków środowiskowych.
Need Help Reviewing a Custom Magnet Assembly?
Send Osenc your drawing, mating-material information, load direction, working environment, magnetic requirement, and prototype quantity.
Osenc can help review the magnet grade, coating, dimensions, tolerance, magnetization direction, and assembly structure before sampling. For bonding-related projects, the adhesive product, process responsibility, and validation requirements must be confirmed separately.
Contact Osenc About Your Magnet Project