





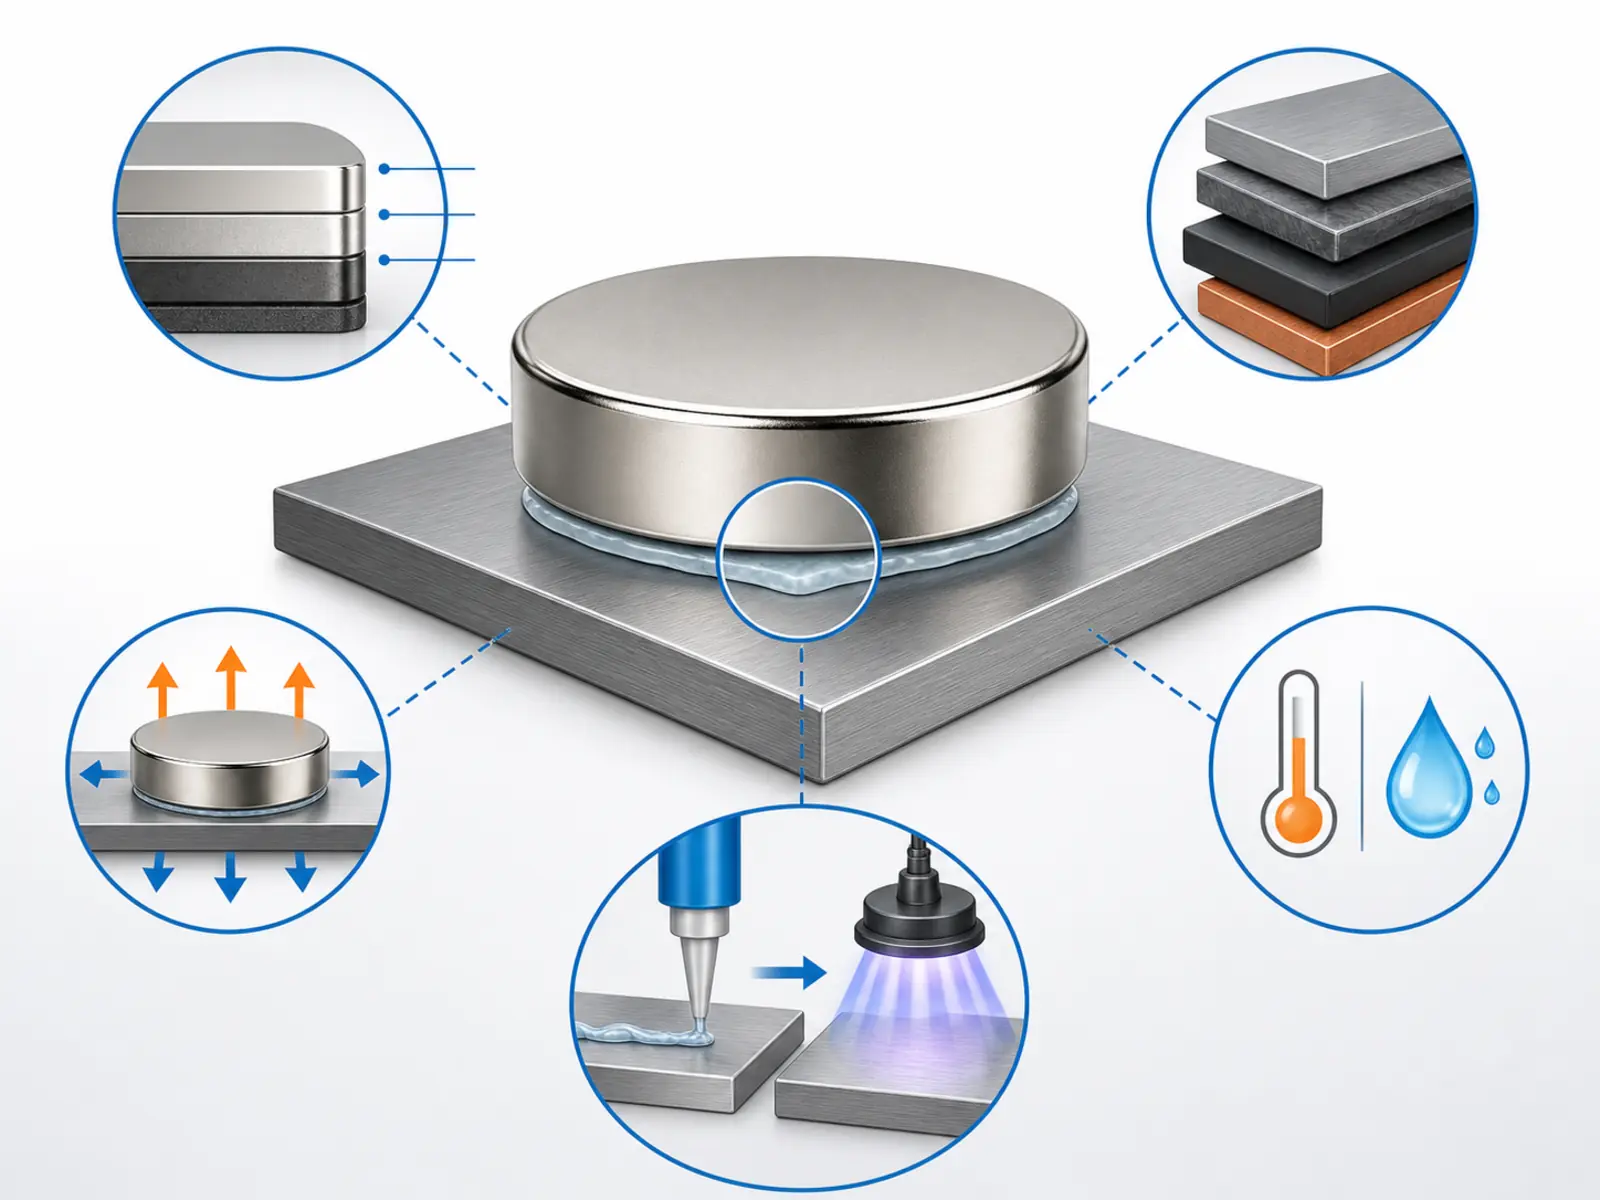
자석에 가장 적합한 접착제는 자석 코팅, 접합 소재, 하중 방향, 사용 환경, 접착 간극 및 생산 공정에 따라 달라집니다. 모든 네오디뮴 자석 어셈블리에 가장 적합한 단일 접착제는 없습니다.
영구적으로 사용하는 산업용 어셈블리의 경우, 엔지니어는 일반적으로 2액형 에폭시 또는 구조용 아크릴 접착제를 우선 검토합니다. 시아노아크릴레이트는 작고 긴밀하게 맞물리는 부품에 적합할 수 있으며, 유연성 접착제 또는 감압 테이프는 적용 조건에 따른 검증이 필요합니다. Permabond의 공식 자석 접착 가이드에 따르면 생산 및 적용 요건에 따라 여러 접착제 계열을 검토할 수 있습니다. Permabond 자석 접착 가이드
이 가이드에서는 외부에서 도포하는 액상, 구조용, 유연성 및 테이프형 접착제를 다룹니다. 접착제가 미리 도포된 자석은 별도의 부착 옵션입니다.
생산 전 확인 사항:
- 자석 코팅과 실제 접합면을 확인하십시오.
- 접합부에 하중이 작용하는 방식을 정의하십시오.
- 온도, 습기, 화학물질, 진동 및 충격 조건을 확인하십시오.
- 선정한 접착제의 최신 TDS와 SDS를 검토하십시오.
- 실제 작동 조건에서 대표 어셈블리를 시험하십시오.
어떤 유형의 접착제를 검토해야 합니까?
아래 표는 제품 승인용이 아닌 스크리닝 도구입니다.
| 접착제 유형 | 평가 대상이 될 수 있는 이유 | 선정 전 확인 사항 |
|---|---|---|
| 2액형 에폭시 | 일정 수준의 간극 대응성이 필요할 수 있는 영구적 강성 어셈블리 및 접합부 | 해당 제품이 두 표면 모두에 접착됩니까? TDS에서 허용하는 간극, 혼합비, 고정 시간, 완전 경화 조건 및 환경 조건은 무엇입니까? |
| 구조용 아크릴 | 신속한 취급이 필요할 수 있는 금속 어셈블리 및 생산 공정 | 활성제나 프라이머가 필요합니까? 자석 코팅, 피착재, 간극 및 생산 공정과 호환됩니까? |
| 시아노아크릴레이트 | 신속한 고정이 필요한 작고 정밀하게 맞물리는 부품 | 실제 간극, 박리, 충격, 습기, 온도 및 사용 수명을 견딜 수 있습니까? |
| 유연성 접착제 또는 폴리우레탄 접착제 | 움직임이나 열팽창 차이를 고려해야 할 수 있는 어셈블리 | 요구 하중에 충분한 강성과 내환경성을 제공합니까? |
| 감압 점착 테이프 | 두께 제어가 필요한 평탄한 표면 및 부착 공정 | 실제 설치 방향에서 장기 하중, 가장자리 노출, 온도, 습기 및 크리프를 견딜 수 있습니까? |
접착제의 화학 조성에 따라 표면 처리, 오픈 타임, 강도 발현, 유연성 및 충격 특성이 달라집니다. 따라서 계열명만을 기준으로 선택하지 말고 개별 제품 수준에서 선정해야 합니다. 3M 구조용 접착제 자료
자석 접착에는 에폭시가 항상 가장 적합합니까?
아닙니다. 에폭시는 사용 가능한 접착제 계열 중 하나이지만, 제품마다 강성, 간극 대응 능력, 경화 공정, 내열성 및 피착재 적합성이 다릅니다.
강성 강재 어셈블리에 적합한 제품이라도 플라스틱 하우징, 반복 충격, 빠른 생산 사이클 또는 큰 열팽창 차이가 있는 조건에는 적합하지 않을 수 있습니다.
구조용 아크릴계 접착제는 언제 검토해야 합니까?
구조용 아크릴계 접착제는 자석-금속 어셈블리와 비교적 빠른 초기 고정이 필요한 생산 공정에서 자주 검토됩니다.
일부 제품에는 활성제, 프라이머 또는 지정된 혼합 공정이 필요합니다. 이러한 요구사항은 샘플링 후에야 확인할 것이 아니라 생산 계획에 반영해야 합니다.
순간접착제로 네오디뮴 자석을 고정할 수 있습니까?
일반적으로 순간접착제라고 하는 시아노아크릴레이트는 표면이 깨끗하고 서로 밀착되는 소형 부품에 사용할 수 있습니다.
초기 고정이 빠르다고 해서 접합부가 큰 간극, 반복 박리, 충격, 습기 또는 장기간의 온도 노출을 견딜 수 있는 것은 아닙니다. 해당 제품의 정확한 기술 문서를 확인하고 실제 어셈블리로 시험하십시오.
자석용 접착제를 선택하기 전에 무엇을 확인해야 합니까?
1. 자석에는 어떤 코팅이 적용되어 있습니까?
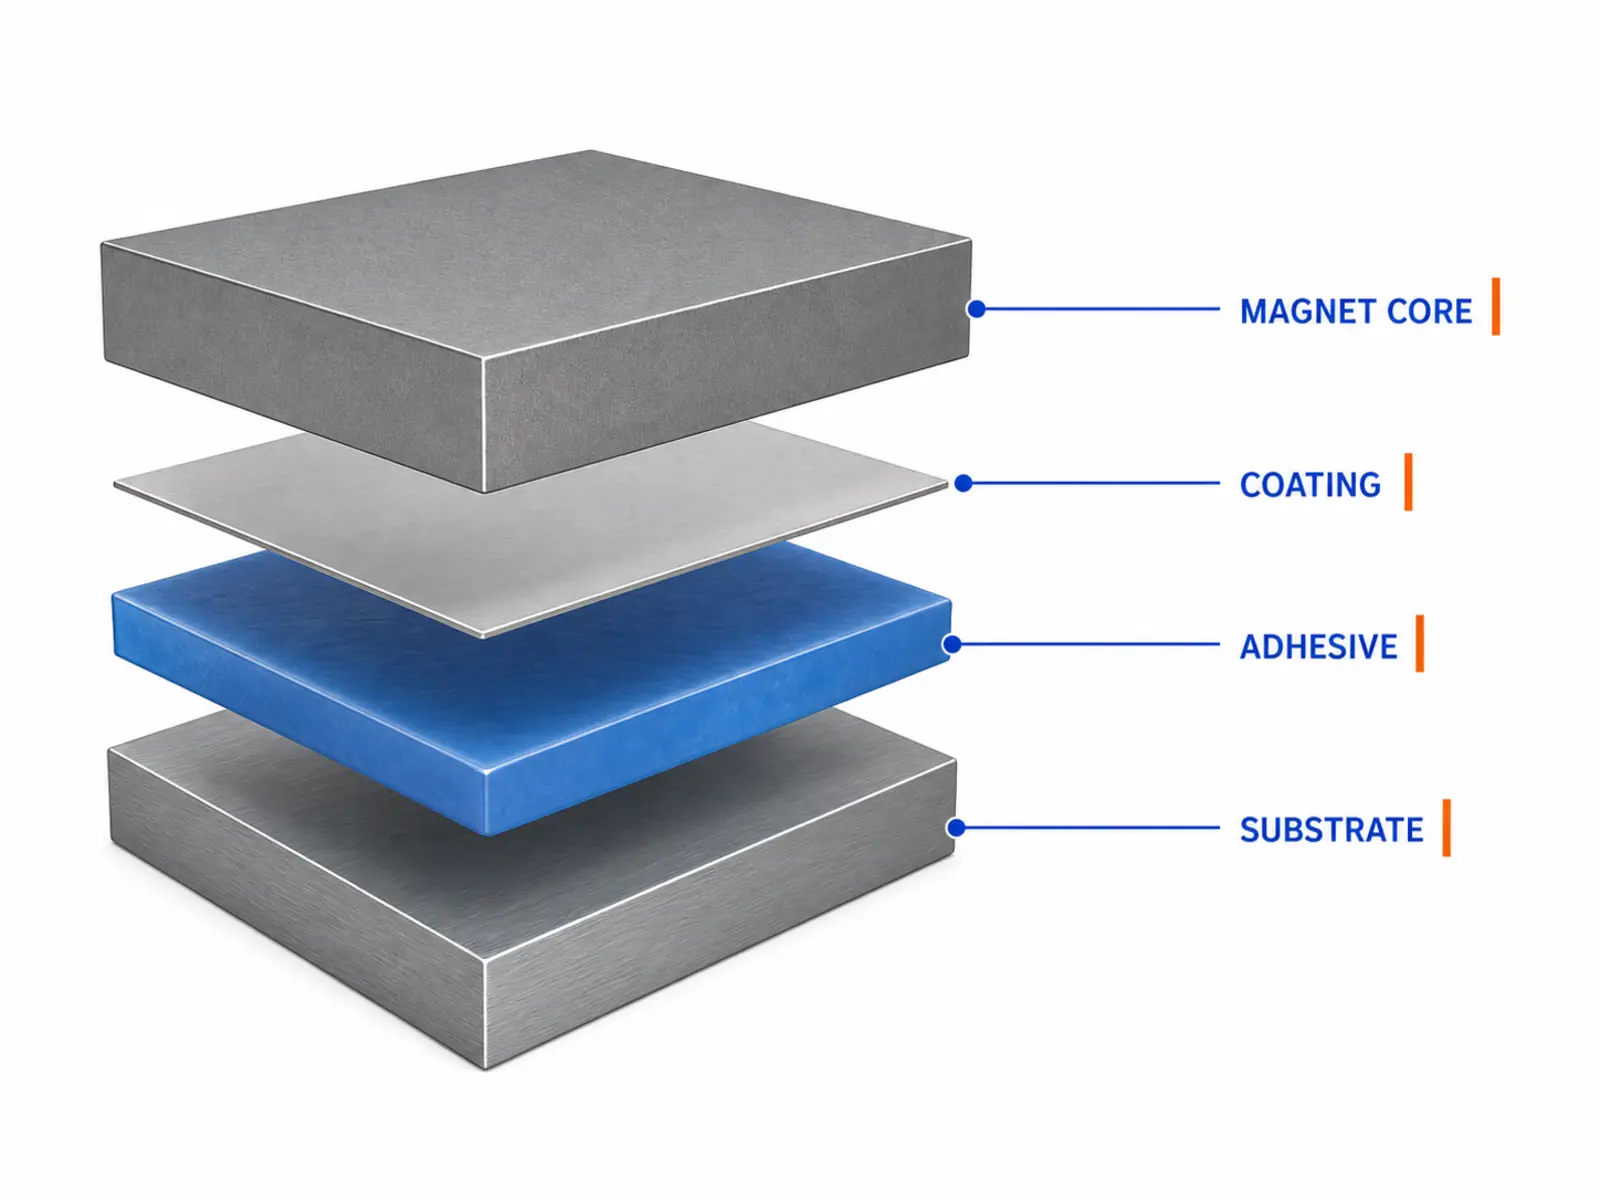
네오디뮴 자석은 일반적으로 외부 코팅을 매개로 접착됩니다. Osenc의 코팅 옵션에는 NiCuNi, 아연, 에폭시, 금, PTFE, Parylene 및 기타 프로젝트별 시스템이 포함될 수 있습니다.
따라서 접착제는 단순히 “네오디뮴’이 아니라 해당 코팅에 접착되어야 합니다.”
NdFeB 소재는 부식에 취약하여 일반적으로 코팅으로 보호합니다. 표면 처리 과정에서 이 보호층이 손상되면 부식 위험이 발생할 수 있습니다. Arnold Magnetic Technologies의 자석 제조 지침
발생 가능한 파손 위치는 다음과 같습니다:
- Between the adhesive and magnet coating.
- Inside the adhesive.
- Inside the coating system.
- Between the coating and magnet.
- Between the adhesive and mating component.
- Between paint or powder coating and its base metal.
Confirm the exact coating before defining the bonding process. See Osenc’s overview of neodymium magnet coatings when preparing the magnet specification.
2. What is the actual mating surface?
Steel, stainless steel, bare aluminum, anodized aluminum, plastic, paint, and powder coating are different bonding surfaces.
The adhesive contacts the surface finish—not the base material written on the drawing. Oil, dust, oxide, release agents, corrosion inhibitors, paint, and plastic additives may affect the joint.
3M’s structural adhesive guidance states that cleaning and surface preparation depend on the substrate and required bond performance. 3M surface preparation technical bulletin
Do not select a cleaning solvent by habit. Confirm it against the adhesive instructions, substrate compatibility information, and solvent SDS.
3. 접합부에는 어떤 하중이 작용합니까?
접착 접합부에는 인장, 압축, 전단, 박리 및 쪼갬 하중이 작용할 수 있습니다.
박리와 쪼갬은 가장자리 부근에 하중을 집중시킵니다. 접합부를 올바르게 설계하면 전단, 인장 및 압축 하중은 접착 면적의 더 넓은 영역에 분산될 수 있습니다. 접착 접합부에서의 3M 일반 응력 유형
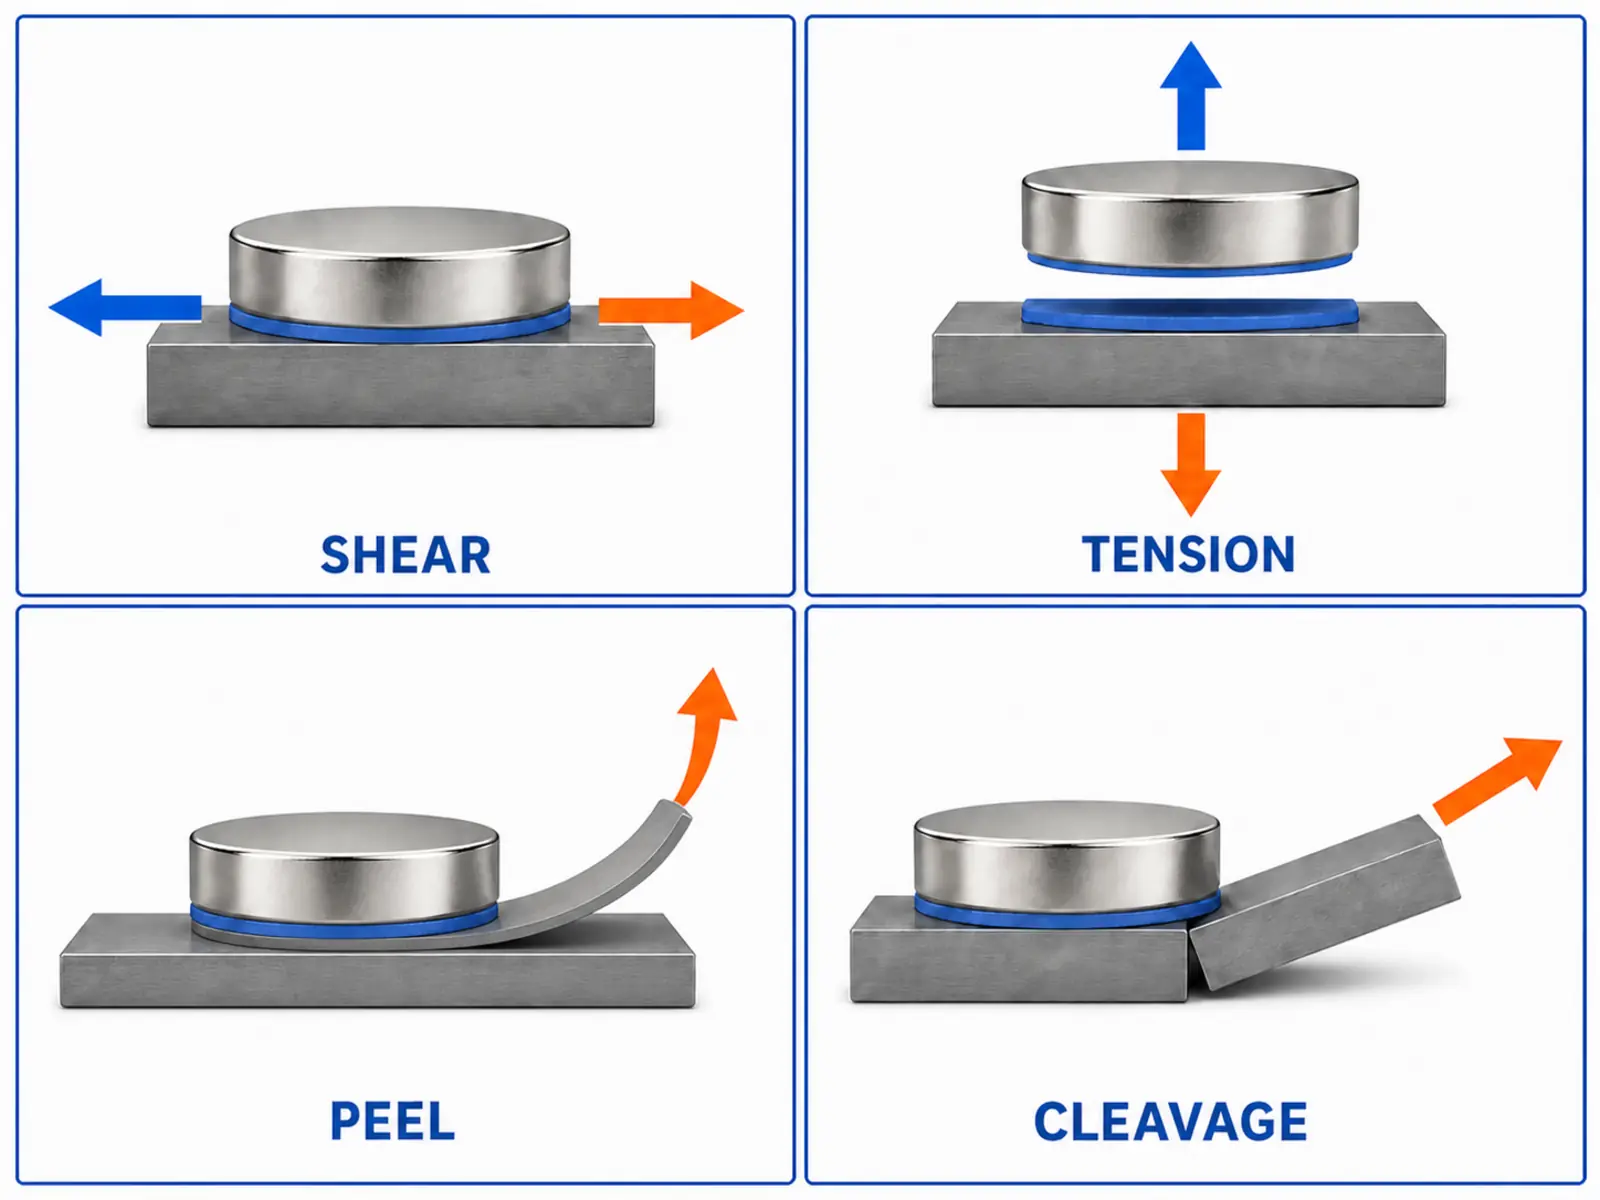
자석에 명시된 인장력이 접착 접합부의 설계 하중이 되는 것은 아닙니다. 자석은 직선 인장 방식으로 시험될 수 있지만, 실제 설치된 접착 접합부에는 전단, 박리, 토크, 충격 또는 이러한 하중의 조합이 작용할 수 있습니다.
다음 두 가지를 모두 문서화하십시오:
- 자석에 요구되는 자기 기능.
- 접착 접합부가 견뎌야 하는 기계적 하중.
4. 어셈블리가 노출될 환경은 어떻습니까?
다음 사항을 확인하십시오:
- 최소 및 최대 사용 온도.
- 조립 및 경화 온도.
- 온도 사이클.
- 습도 또는 물 노출.
- 오일, 세정제, 연료 또는 기타 화학물질.
- Indoor or outdoor use.
- Vibration and impact.
- Required service life.
- Consequences if the joint fails.
Do not confuse adhesive application temperature, curing temperature, short-term exposure, and continuous service temperature.
The magnet grade, coating, adhesive, substrate, and nearby components must all tolerate the relevant conditions. There is no grade-independent temperature limit that can be applied to every neodymium magnet.
5. What gap and production process are available?
다음 사항을 확인하십시오:
- Designed adhesive gap.
- Dimensional variation between parts.
- Mix ratio, if applicable.
- Dispensing method.
- Working time.
- Fixture time.
- Full-cure conditions.
- Production quantity.
- Allowed squeeze-out.
- Inspection method.
Fixture time is not the same as full cure. Adhesive manufacturers report these as separate process conditions, and both can change with product and curing environment. 3M choosing and using a structural adhesive
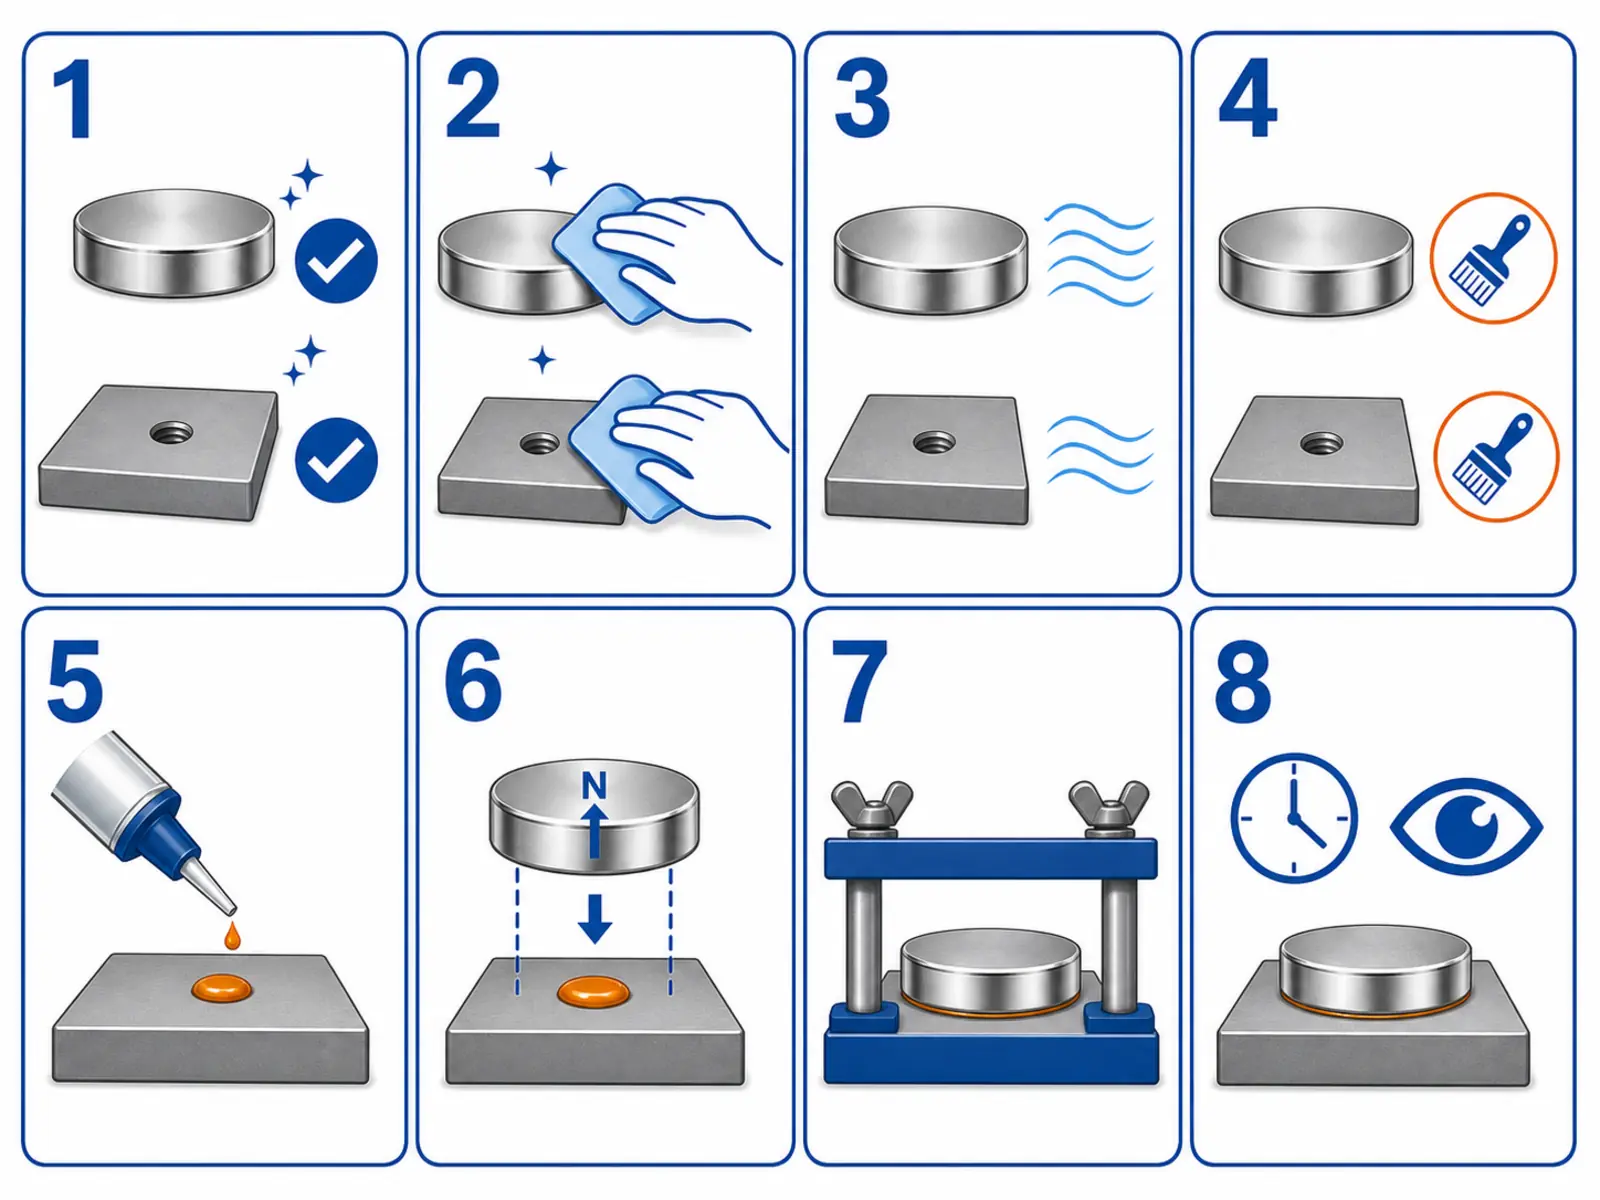
How Do You Glue Neodymium Magnets Step by Step?
Step 1: Confirm the coating and adhesive instructions
Identify the magnet coating, mating material, and surface finish.
Review the current TDS and SDS for the selected adhesive. Confirm surface preparation, gap, dispensing, mix ratio, fixture time, full cure, temperature, storage, and safety requirements.
Step 2: Dry-fit the assembly and check polarity
Check dimensions, clearance, adhesive space, magnetization direction, polarity, and fixture access before applying adhesive.
Strong magnets can attract steel tools, fixtures, and other magnets suddenly. Control the work area to reduce collision, chipping, pinching, and polarity errors.
Sintered rare-earth magnets are brittle and require careful handling. Arnold Magnetic Technologies magnet selection guidance
Also confirm whether bonding occurs before or after magnetization. There is no universal best sequence. The magnet and assembly supplier should review handling, polarity control, fixture design, surrounding components, and whether the completed assembly can be magnetized as intended.
Step 3: Clean the bonding surfaces
Remove contamination using a procedure that is compatible with:
- The magnet coating.
- The mating substrate.
- The selected adhesive.
- Workplace safety requirements.
Do not assume that one solvent works for every coating, plastic, paint, or adhesive. Allow the surfaces to reach the condition required by the adhesive instructions before bonding.
Step 4: Perform only the required surface treatment
Use abrasion, primer, plasma treatment, or another pretreatment only when required or permitted by the selected adhesive instructions and confirmed as compatible with the magnet coating.
Do not define a process that damages or removes the protective coating. If coating compatibility is unknown, pause and obtain confirmation from the magnet and adhesive suppliers.
Step 5: Apply a controlled amount of adhesive
Follow the required dispensing and mixing process.
Too little adhesive may leave incomplete coverage. Too much may create squeeze-out, contaminate nearby surfaces, interfere with final dimensions, or produce an uncontrolled gap.
Do not estimate a two-part mix ratio unless the product instructions explicitly permit that method.
Step 6: Position and fixture the magnet
Place the magnet in the correct orientation and hold it without sliding or rotating.
The fixture should maintain the required gap and alignment. It should not apply uncontrolled pressure that removes too much adhesive from the joint.
Step 7: Complete the specified cure
Maintain the time and temperature stated in the product TDS. Do not load or test the assembly merely because it has reached handling strength.
If heat is used, confirm that the complete cycle is compatible with the magnet grade, coating, substrate, fixture, adhesive, and surrounding components.
Step 8: Inspect the joint
Check:
- Magnet alignment and polarity.
- Visible movement.
- Squeeze-out.
- Incomplete coverage or visible voids.
- Coating damage.
- Interference with nearby parts.
- Compliance with the required cure record.
A visual inspection cannot prove long-term bond strength, but it can identify obvious process defects before validation testing.
How Do You Glue a Magnet to Metal?
Identify the actual metal surface before choosing the preparation process.
| Metal surface | What must be confirmed |
|---|---|
| Bare steel | Oil, oxide, corrosion inhibitor, roughness, and required preparation |
| 스테인리스강 | Grade, surface finish, contamination, and adhesive compatibility |
| Bare aluminum | Oxide condition and required pretreatment |
| Anodized aluminum | Condition and sealing of the anodized layer |
| Painted or powder-coated metal | Adhesion and durability of the coating itself |
| Plated metal | Plating type, condition, cleanliness, and adhesion to the base material |
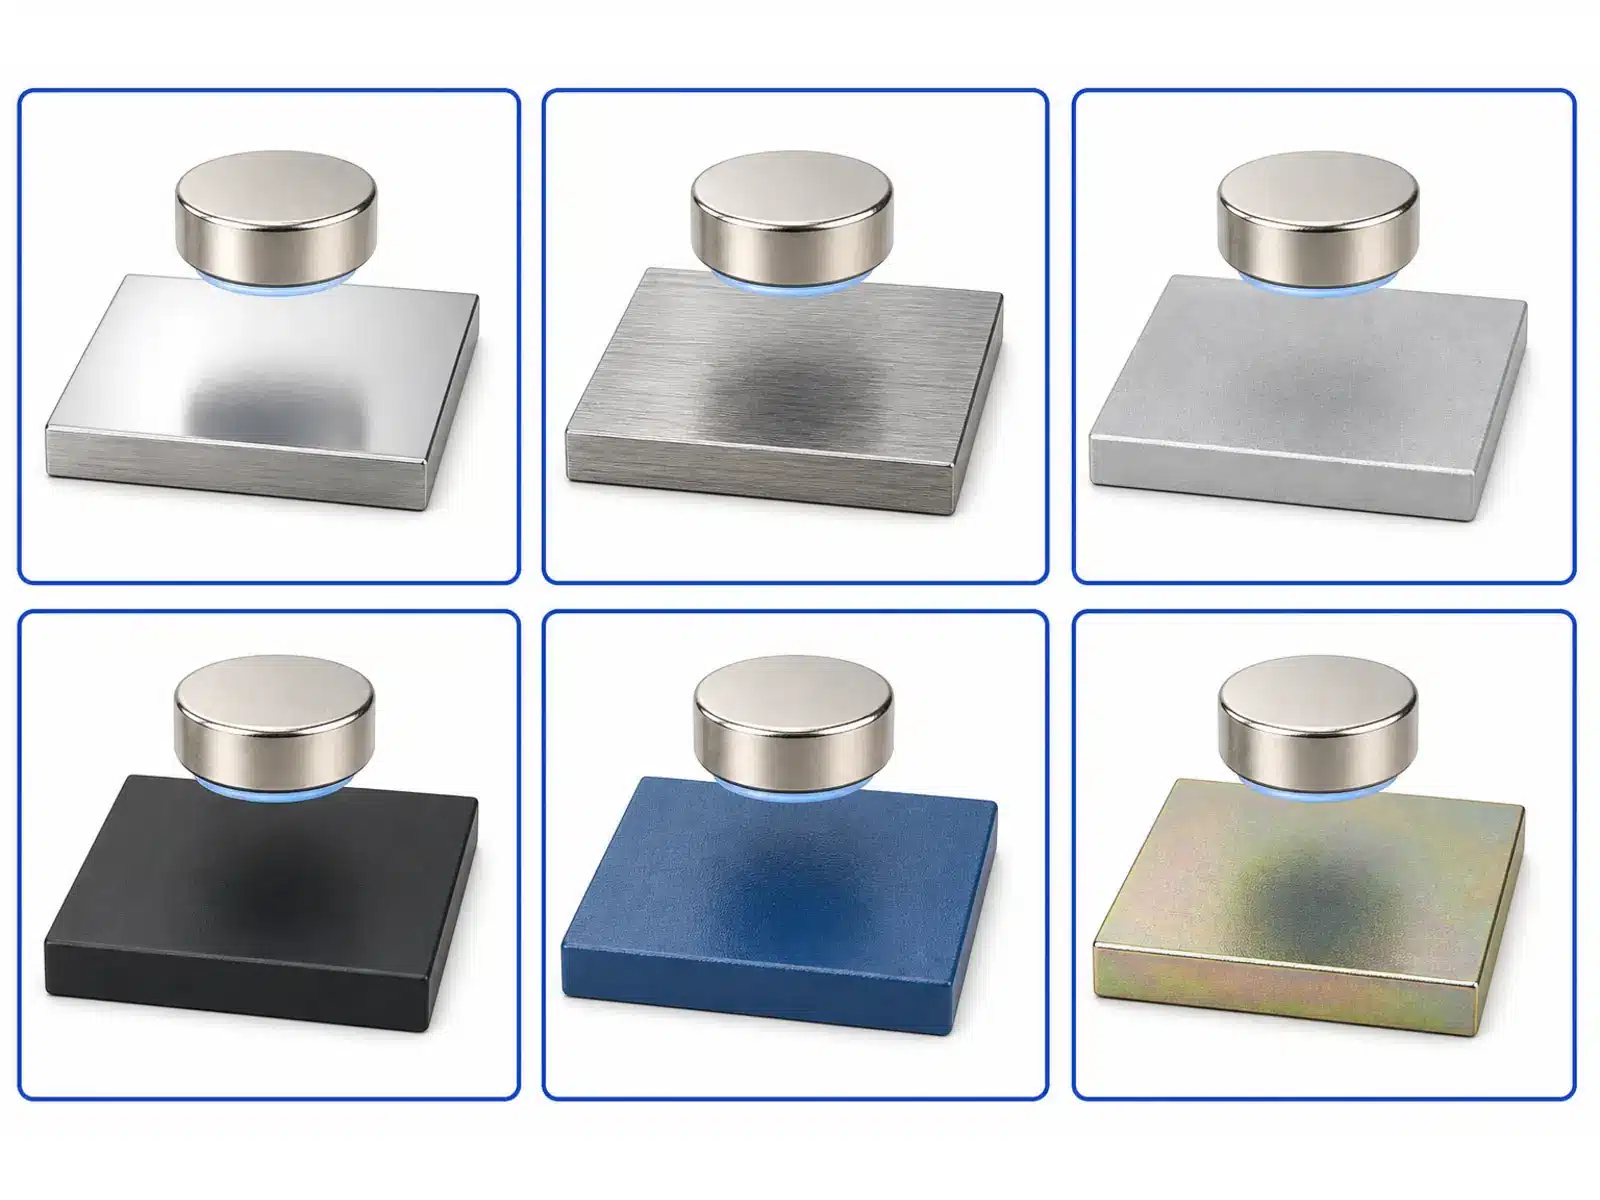
For painted, powder-coated, plated, or anodized parts, the adhesive is bonded to the surface layer. A strong adhesive cannot compensate for a surface layer that separates from its base material.
If the bonded metal also forms part of the magnetic circuit, include the adhesive location and intended bond gap in the drawing. Osenc can evaluate the magnetic layout when the complete geometry, magnetization direction, steel component, and working requirement are supplied.
Should You Sand a Neodymium Magnet Before Gluing It?
Not automatically.
Abrasion should be used only when the selected adhesive instructions require or permit it and the process is compatible with the magnet coating. Aggressive sanding can damage the protective surface.
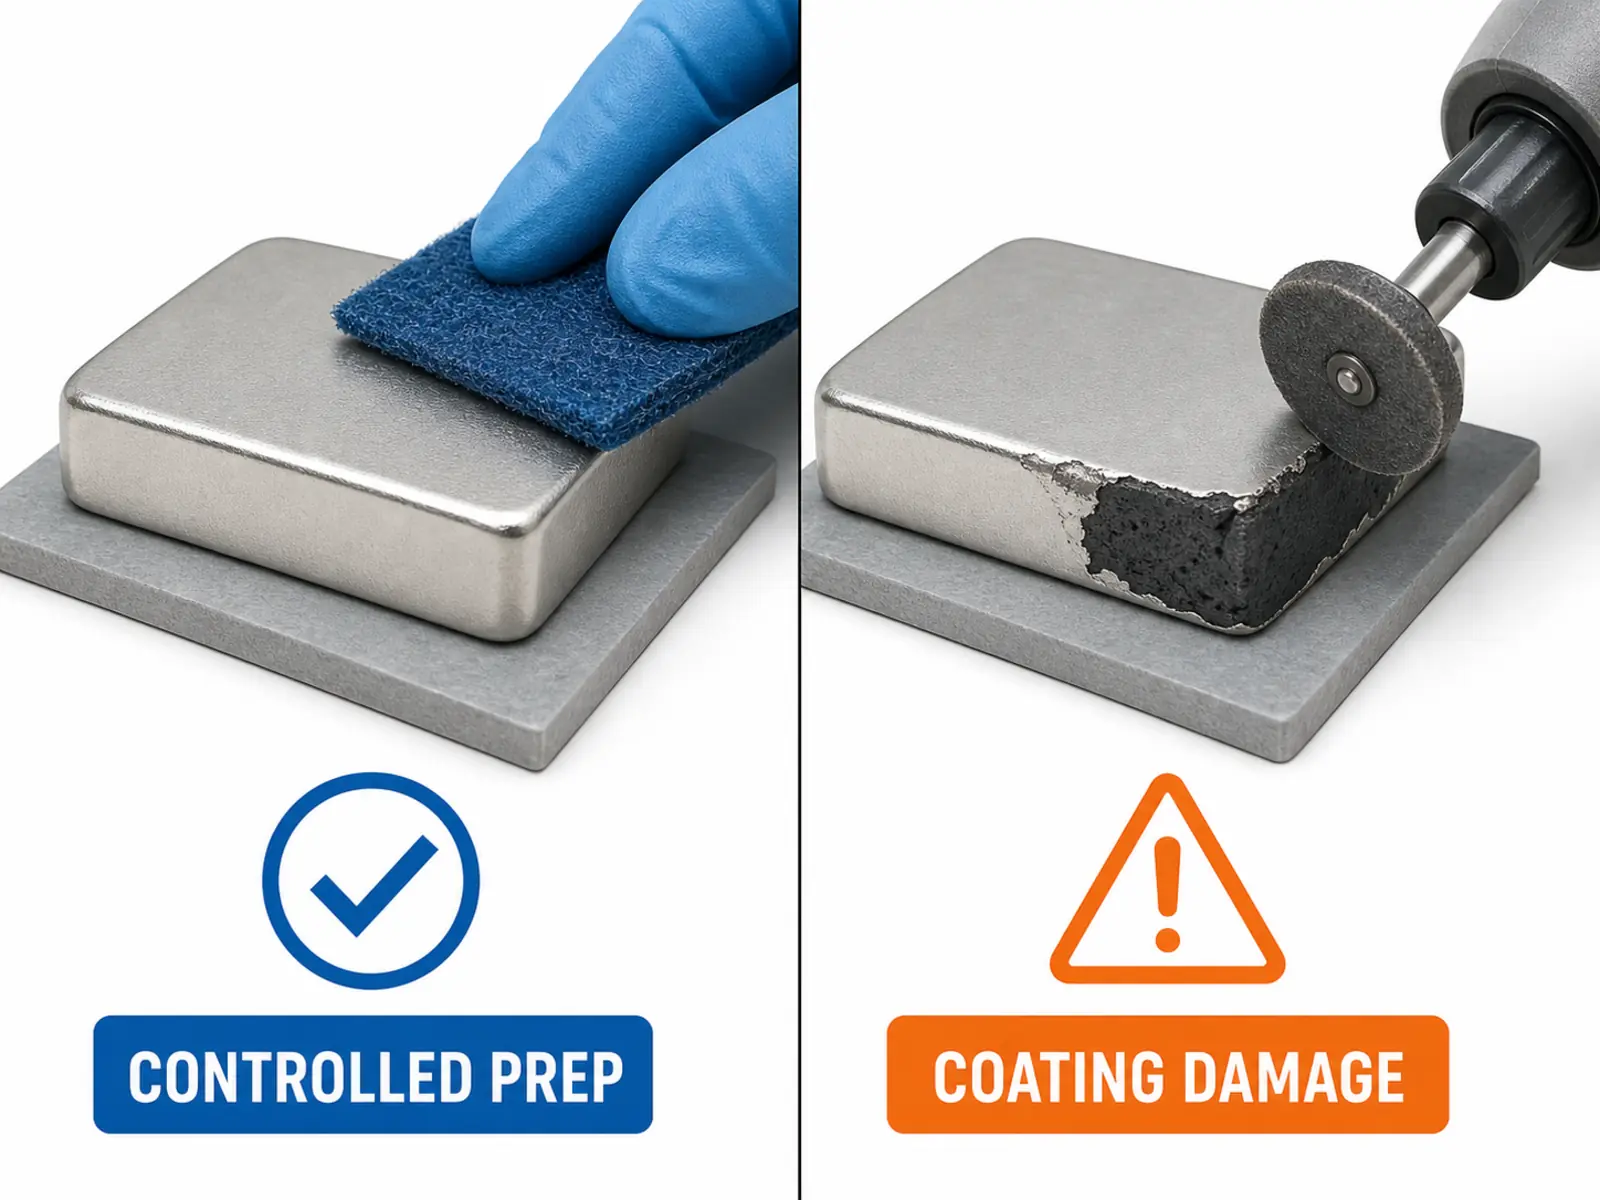
Do not use a universal abrasive grade, sanding time, pressure, or percentage of surface area. Do not deliberately sand through the coating to expose another layer unless a qualified process has been reviewed and approved for that exact magnet and adhesive system.
If abrasion is approved, production instructions should define:
- Abrasive material.
- Process direction.
- Applied pressure or equipment settings.
- Cleaning after abrasion.
- Coating inspection.
- Acceptance criteria.
Without these controls, manual sanding may create inconsistent production results.
Why Do Glued Magnets Fail?
Inspect the failure surface before changing the adhesive.
| Failure observation | Possible causes to investigate | What to check |
|---|---|---|
| Adhesive separates cleanly from the magnet | Contamination, incompatible coating, or incomplete surface preparation | Coating identity, cleaning record, primer, and adhesive compatibility |
| Adhesive separates from the mating component | Contamination or weak surface layer | Paint, oxide, plastic additives, oil, or release agent |
| Adhesive tears inside itself | Excessive load, unsuitable properties, or incomplete cure | Load direction, bond area, temperature, mix ratio, and cure record |
| Magnet coating lifts | Coating-interface failure or coating damage | Incoming coating condition, surface preparation, and environmental exposure |
| Joint opens from one edge | Peel or cleavage loading | Joint geometry, stiffness, impact, and mechanical retention |
| Adhesive remains soft | Incorrect mixing, cure conditions, or material storage | Mix ratio, batch, storage, temperature, and full-cure time |
| Failure appears after service exposure | Moisture, chemicals, cycling, corrosion, or creep | Environmental conditions and material compatibility |
| Magnet breaks while the bond remains | Impact, stress concentration, or unsupported brittle material | Housing geometry, assembly handling, and edge loading |
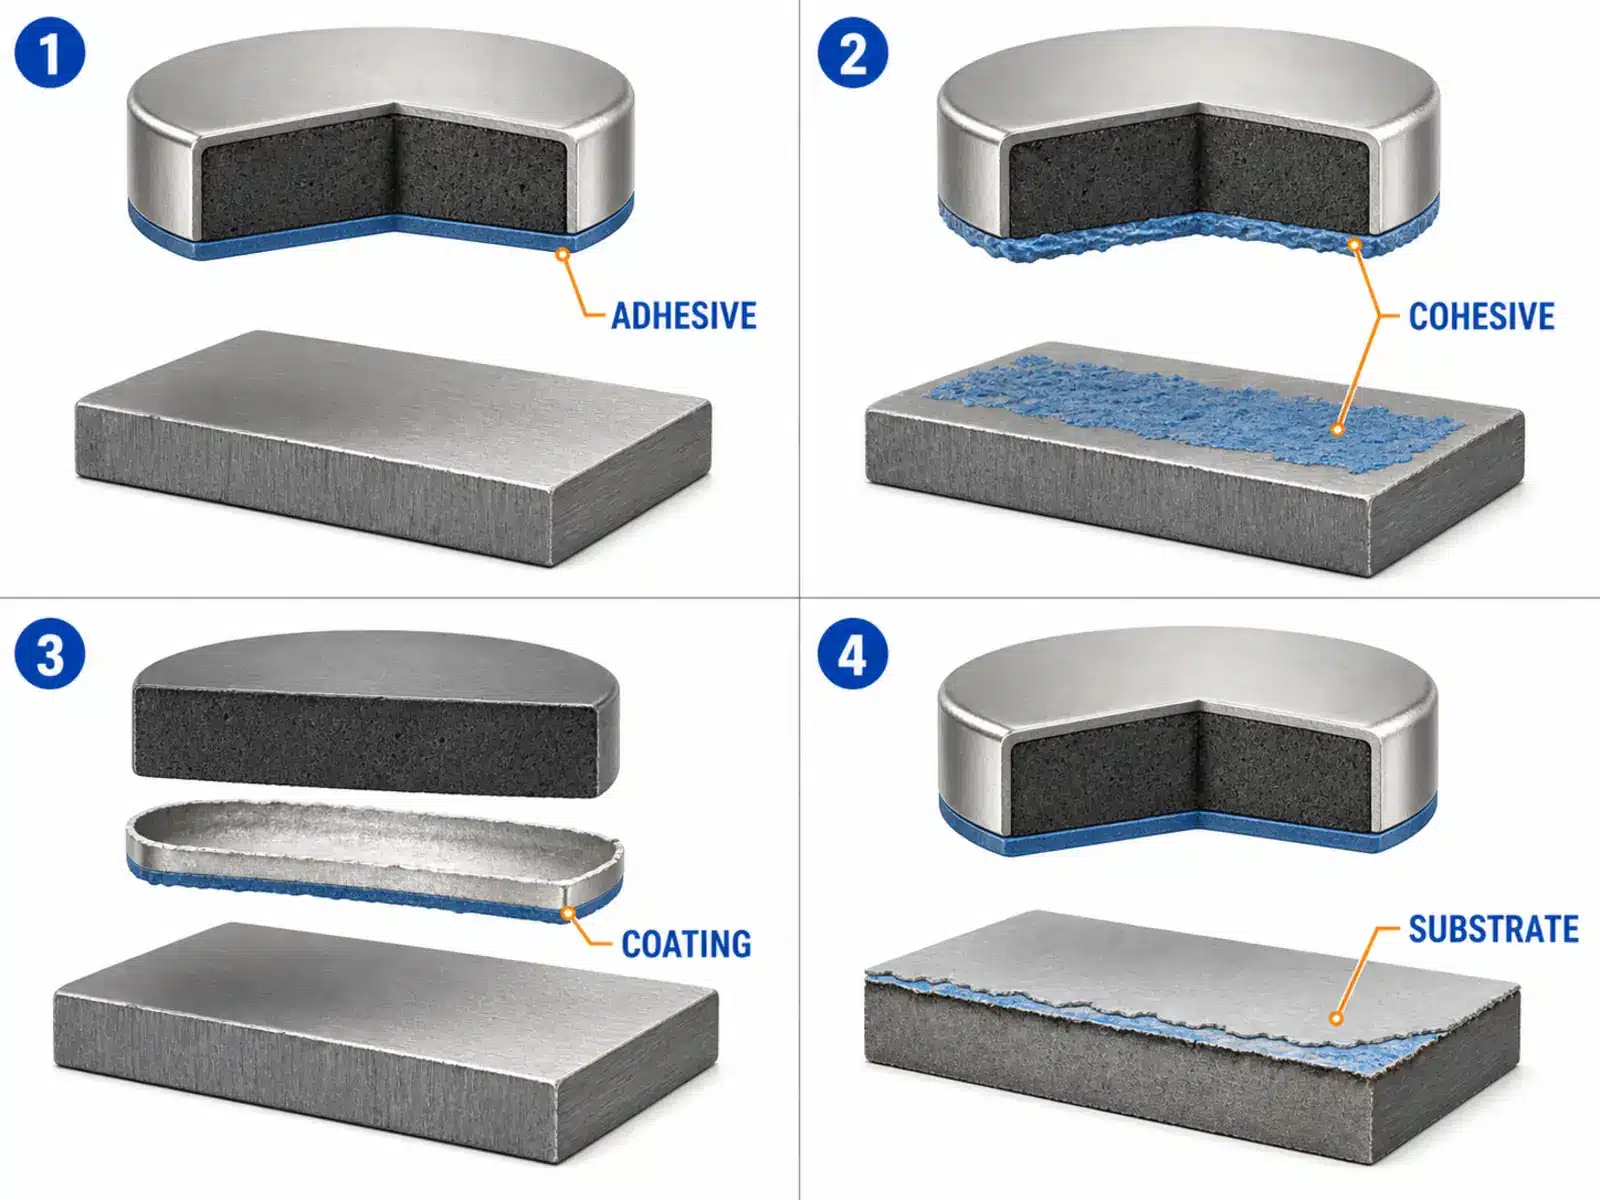
Record the number of failed samples, failure location, cure conditions, environmental exposure, and load direction. These details are more useful than simply reporting that “the glue failed.”
When Is Glue Alone Not Enough?
Consider mechanical retention when the assembly faces:
- Repeated peel or impact.
- High vibration.
- Rotation.
- Severe thermal or environmental cycling.
- Difficult-to-control surfaces.
- Safety-related consequences if the magnet separates.
Possible design options include a pocket, shoulder, cover, retaining cap, or housing that limits movement.
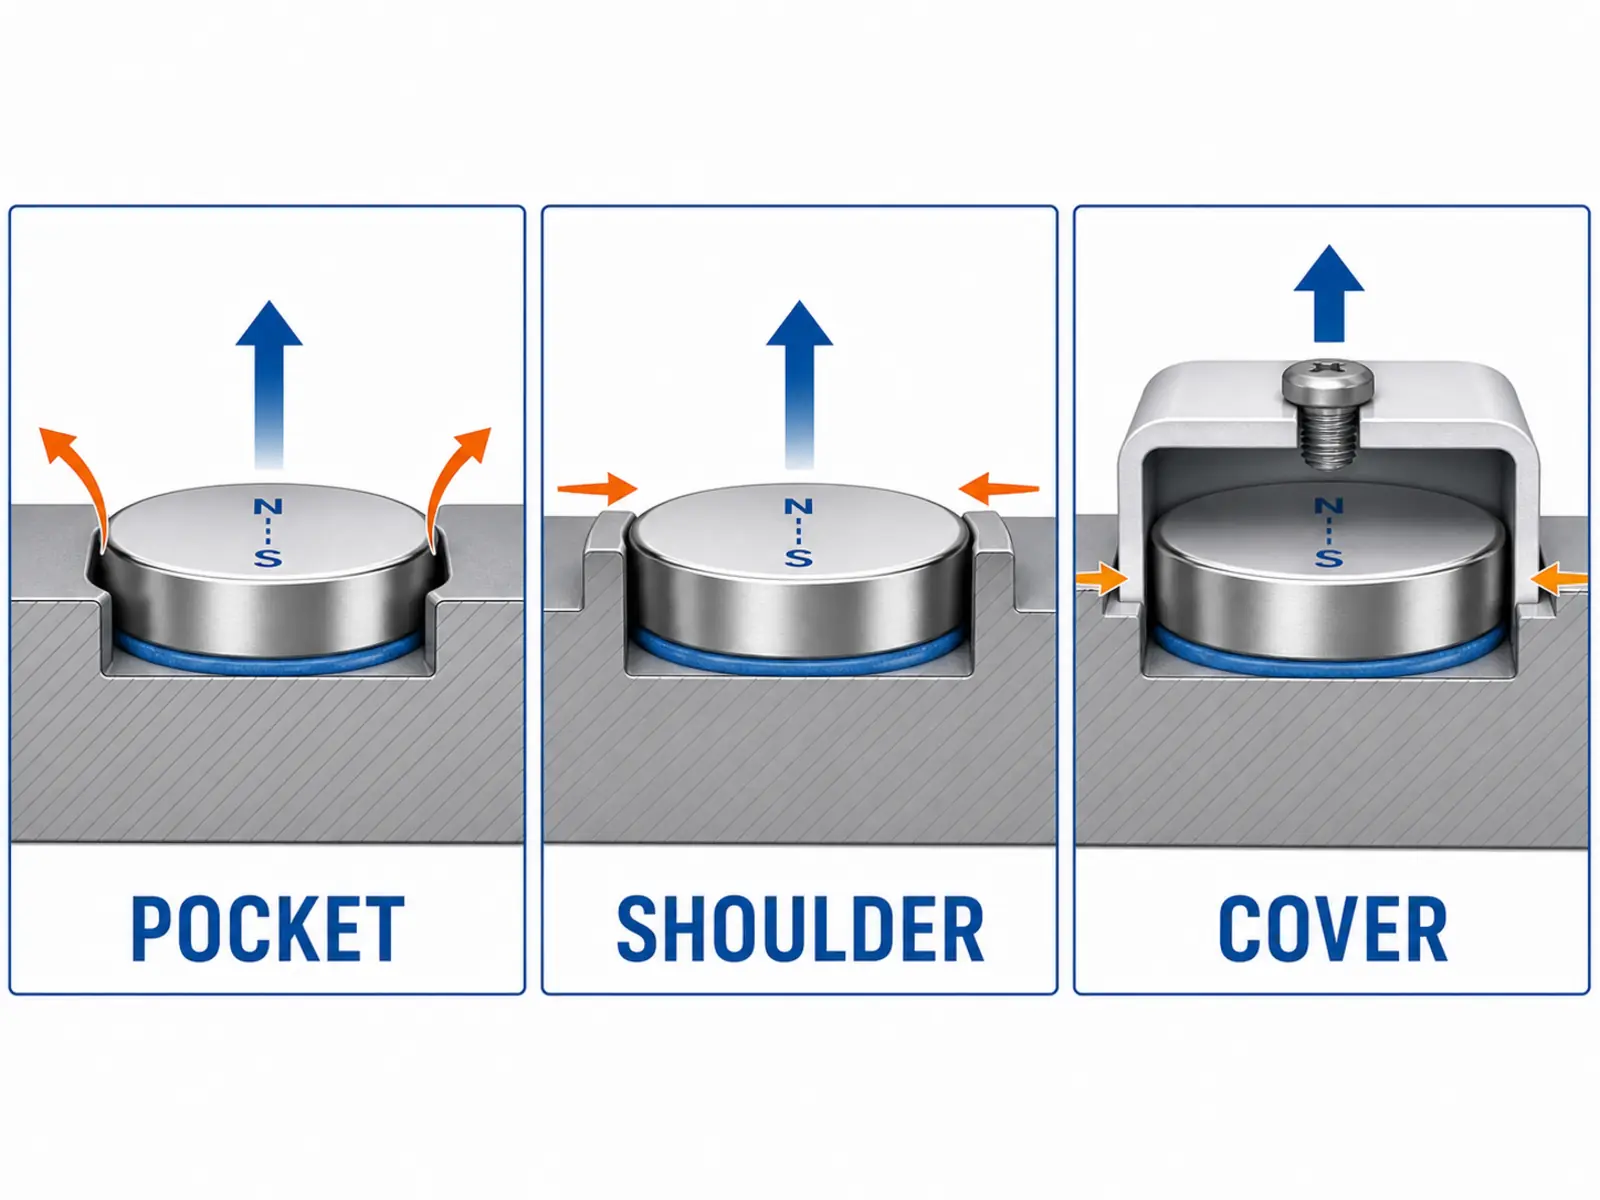
These are design options, not universal solutions. Geometry, material, clearance, magnetic function, assembly method, and stress on the brittle magnet require project-specific review.
3M’s joint-design guidance also shows that geometry can redistribute concentrated cleavage or peel loads and may add mechanical support. 3M adhesive joint design guidance
How Should You Validate the Bond Before Production?
Test representative production parts rather than relying only on a hand pull or a generic adhesive strength value.
| Validation input | What to record |
|---|---|
| 자석 | Grade, coating, dimensions, magnetization, and production condition |
| Mating component | Material, surface finish, cleanliness, and geometry |
| 접착제 | Exact product, batch, storage condition, and application method |
| Process | Surface preparation, amount, gap, fixture, cure time, and temperature |
| Samples | Sample quantity and production variation represented |
| Load | Direction, rate, magnitude, duration, impact, torque, or combined loading |
| 환경 조건 | Temperature, cycling, humidity, water, and chemicals |
| Results | Measured value, movement, visible damage, and failure location |
| Acceptance | Project-defined pass/fail requirement and consequence of failure |
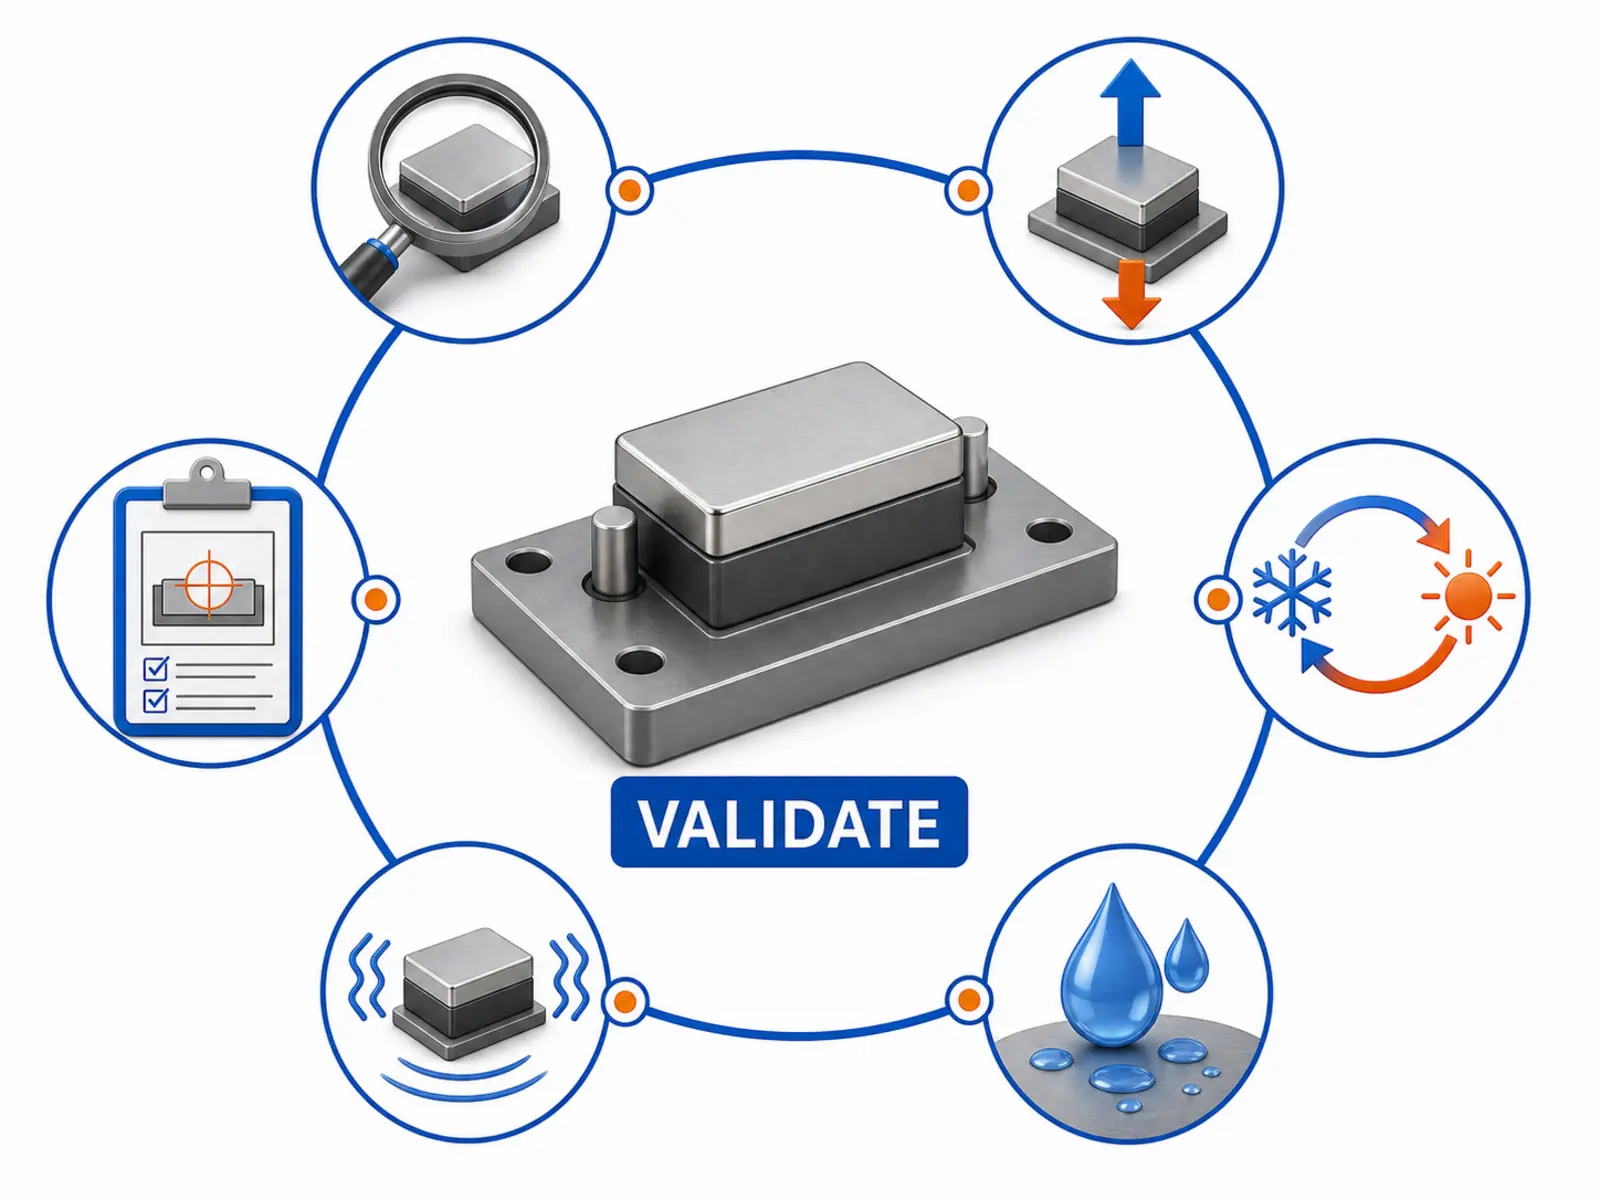
The project must define the sample quantity, conditioning, loading method, acceptance value, and safety factor. This article does not provide universal test values.
What Information Should You Include in a Magnet Bonding RFQ?
Send:
- Magnet drawing, dimensions, and shape.
- Required magnetic function.
- Magnet grade, if already selected.
- Magnetization direction and pole layout.
- Magnet coating.
- Mating-component material and surface finish.
- Available bond area.
- Designed adhesive gap and dimensional variation.
- Mechanical load direction.
- Required magnetic pull, field, torque, positioning, sensing, or coupling result.
- Assembly and operating temperatures.
- Humidity, water, chemical, vibration, and impact exposure.
- Expected service life.
- Consequences if the magnet separates.
- Whether bonding occurs before or after magnetization.
- Proposed adhesive, primer, or activator, if already selected.
- Production quantity and target process time.
- Required inspection and validation method.
- Need for mechanical retention.
- Prototype quantity.
Osenc can review drawings and application requirements for 맞춤형 네오디뮴 자석에 사용하면, including grade, coating, dimensions, tolerance, magnetization direction, and assembly structure.
This review can help identify fit, polarity, coating, and magnetic-layout risks before sampling. Adhesive selection, bonding-process capability, and joint validation must still be confirmed for each project.
자주 묻는 질문
네오디뮴 자석에 가장 적합한 접착제는 무엇입니까?
에폭시 및 구조용 아크릴 제품은 영구 조립을 위한 일반적인 선택지이지만, 최적의 선택은 코팅, 기재, 간극, 하중, 환경 및 경화 공정에 따라 달라집니다.
순간접착제로 네오디뮴 자석을 고정할 수 있나요?
작고 밀착되는 부품을 고정할 수 있습니다. 간극, 박리, 충격, 수분, 온도 및 사용 수명 요구사항에 맞는지 해당 제품을 검증하십시오.
자석에 핫멜트 접착제를 사용할 수 있습니까?
핫멜트 접착제가 적합하다고 가정하지 마십시오. 사용 온도, 장기 하중 거동, 환경 저항성, 그리고 선택한 자석 등급 및 코팅과의 호환성을 확인하십시오.
네오디뮴 자석을 접착하기 전에 표면을 샌딩해야 하나요?
접착제 사용 지침에서 허용하고, 전처리 공정이 코팅과 호환되는 것으로 확인된 경우에만 실시하십시오. 보호층이 벗겨질 정도로 연마하지 마십시오.
자석용 접착제의 경화 시간은 얼마나 되어야 합니까?
해당 제품의 TDS에 명시된 완전 경화 요건을 따르십시오. 고정 가능 시간 또는 취급 가능 시간이 지났다고 해서 접합부가 완전히 경화된 것은 아닙니다.
접착한 자석이 떨어지는 이유는 무엇입니까?
일반적인 조사 항목에는 오염, 호환되지 않는 표면, 불완전 경화, 코팅 손상, 과도한 간극 및 박리 하중이 포함됩니다.
접착제 두께가 자력을 감소시키나요?
접착층이 기능상 중요한 자기 간극이나 자기 회로를 변화시키는 경우에는 영향을 미칠 수 있습니다. 그 영향은 전체 어셈블리 형상에 따라 달라지므로 해당 설계를 기준으로 평가해야 합니다.
액상 접착제를 사용해야 하나요, 아니면 접착식 자석을 사용해야 하나요?
접착면이 있는 자석은 적합한 평탄면에 부착하는 작업을 간소화할 수 있습니다. 도포형 구조용 접착제는 설계 접합부, 소재, 간극 및 환경 조건에 따라 다양한 선택지를 제공합니다.
Need Help Reviewing a Custom Magnet Assembly?
Send Osenc your drawing, mating-material information, load direction, working environment, magnetic requirement, and prototype quantity.
Osenc can help review the magnet grade, coating, dimensions, tolerance, magnetization direction, and assembly structure before sampling. For bonding-related projects, the adhesive product, process responsibility, and validation requirements must be confirmed separately.
Contact Osenc About Your Magnet Project